- Table of Contents
-
- 27-WLAN Configuration Guide (AC)
- 00-Preface
- 01-Compatibility of hardware and AC functionality
- 02-AP management configuration
- 03-Radio management configuration
- 04-WLAN access configuration
- 05-WLAN security configuration
- 06-WIPS configuration
- 07-WLAN QoS configuration
- 08-WLAN roaming configuration
- 09-WLAN load balancing configuration
- 10-WLAN radio resource measurement configuration
- 11-Channel scanning configuration
- 12-Band navigation configuration
- 13-WLAN high availability configuration
- 14-Wireless location configuration
- 15-WLAN multicast optimization configuration
- 16-User isolation configuration
- 17-WLAN probe configuration
- 18-Spectrum management configuration
- 19-WLAN optimization configuration
- 20-WLAN RRM configuration
- 21-WLAN IP snooping configuration
- 22-WLAN radio load balancing configuration
- 23-Client roaming center configuration
- Related Documents
-
| Title | Size | Download |
|---|---|---|
| 14-Wireless location configuration | 392.23 KB |
Restrictions and guidelines: Wireless location configuration
Wireless location tasks at a glance
AeroScout location tasks at a glance
RF fingerprinting tasks at a glance
CUPID location tasks at a glance
Configuring AeroScout location
Specifying the AeroScout location mode
Specifying an IPv4 address and port number for the location server
Specifying a port to listen for messages from the location server
Specifying a multicast MAC address for Tags
Specifying the type of devices to locate
Enabling MU location packet aggregation
Specifying the report mode for AeroScout location packets
Specifying an IPv4 address and a port number for the location server
Specifying a port to listen for messages from the location server
Specifying a multicast MAC address for Tags
Specifying the type of devices to locate
Configuring raw frame reporting
Configuring MU information reporting
Specifying the location packet format
Specifying the report mode for location packets
Specifying the CUPID location server
Specifying a port to listen for messages from the location server
Configuring client list reporting
Configuring unassociated client information reporting
Configuring unassociated client location
Specifying the location packet format
Specifying the report mode for location packets
Configuring wireless location common parameters
Enabling ignoring beacon frames
Configuring RSSI-based packet filtering
Configuring client packet rate limiting
Configuring location packet rate limiting
Configuring wireless location keepalive
Verifying and maintaining wireless location
Wireless location configuration examples
Example: Configuring AeroScout location
Configuring wireless location
About wireless location
Wireless location tracks 802.11 devices for medical monitoring, asset management, and logistics management.
Wireless location system
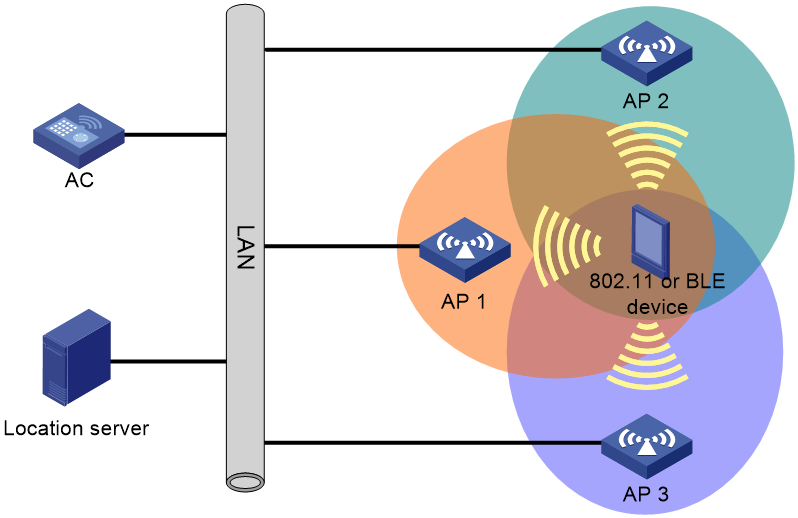
As shown in Figure 1, a wireless location system contains 802.11 devices, information receivers (802.11 APs), and a location server. 802.11 devices include Tags (small wireless devices that can only send 802.11 packets periodically) and MUs (all 802.11 devices except Tags).
Figure 1 Wireless location system
Wireless location mechanism
Wireless location operates as follows:
1. The 802.11 device sends a wireless packet.
2. Upon receiving the wireless packet, the APs encapsulate the collected location information (including RSSI and timestamp) in location packets, and then send the packets to the location server.
3. The location server calculates the location of the 802.11 device.
A location server needs location information from a minimum of three APs to locate an 802.11 device.
Wireless location methods
AeroScout
AeroScout location is used to locate Tags and MUs by using signal strength triangulation. Signal strength triangulation determines the location of a client by triangulating the relative signal strength detected by a minimum of three APs in the WLAN.
RF fingerprinting
RF fingerprinting sets up a fingerprint database by collecting signal strength and location of clients. To locate a client, an AP encapsulates the location information of the client into a location packet and sends the packet to the location server. The location server uses a location algorithm to match the signal strength of the client against information in the database to locate the client.
RF fingerprinting is used to locate MUs and Tags.
CUPID
CUPID location is an H3C-proprietary location method. It uses the round-trip time (RTT) to locate MUs, including associated and unassociated clients. CUPID location is more accurate than RSSI-based location because it is more immune to interference, multipath effect, deployment density, and environment changes.
The location server selects a group of location APs for each associated client based on the client list reports and then sends a location request to each AP. The AP then locates the clients in the client list contained in the location request.
To locate an associated client, the AP sends a measurement packet to the client. Upon receiving a response, the AP encapsulates the information (including the sending time and receiving time) into a location packet, and then sends the location packet to the location server. The location server uses the information to calculate the location of the client.
For an AP to locate unassociated clients, enable unassociated client location for the AP. For more information about unassociated client location, see "Configuring unassociated client location."
Restrictions and guidelines: Wireless location configuration
You can configure APs by using the following methods:
· Configure APs one by one in AP view.
· Assign APs to an AP group and configure the AP group in AP group view.
· Configure all APs in global configuration view.
For an AP, the settings made in these views for the same parameter take effect in descending order of AP view, AP group view, and global configuration view.
Wireless location tasks at a glance
AeroScout location tasks at a glance
To configure AeroScout location, perform the following tasks:
1. Enabling AeroScout location
2. Enabling radio-based location
3. Specifying the AeroScout location mode
4. Specifying an IPv4 address and port number for the location server
5. Specifying a port to listen for messages from the location server
6. Specifying a multicast MAC address for Tags
7. Specifying the type of devices to locate
8. (Optional.) Specifying the timestamp type
9. (Optional.) Enabling MU location packet aggregation
10. (Optional.) Specifying the report mode for AeroScout location packets
11. (Optional.) Configuring wireless location common parameters
¡ Enabling ignoring beacon frames
¡ Configuring RSSI-based packet filtering
¡ Configuring client packet rate limiting
¡ Configuring location packet rate limiting
RF fingerprinting tasks at a glance
To configure RF fingerprinting, perform the following tasks:
2. Enabling radio-based location
3. Specifying an IPv4 address and a port number for the location server
4. Specifying a port to listen for messages from the location server
5. Specifying a multicast MAC address for Tags
6. Specifying the type of devices to locate
7. (Optional.) Configuring raw frame reporting
8. (Optional.) Configuring MU information reporting
9. (Optional.) Specifying the location packet format
10. (Optional.) Specifying the report mode for location packets
11. (Optional.) Configuring wireless location common parameters
¡ Enabling ignoring beacon frames
¡ Configuring RSSI-based packet filtering
¡ Configuring client packet rate limiting
¡ Configuring location packet rate limiting
¡ Configuring wireless location keepalive
CUPID location tasks at a glance
To configure CUPID location, perform the following tasks:
2. Specifying the CUPID location server
3. Specifying a port to listen for messages from the location server
4. Configuring client list reporting
5. (Optional.) Configuring unassociated client information reporting
6. (Optional.) Configuring unassociated client location
7. (Optional.) Specifying the location packet format
8. (Optional.) Specifying the report mode for location packets
9. (Optional.) Configuring wireless location common parameters
¡ Configuring wireless location keepalive
Configuring AeroScout location
Enabling AeroScout location
About this task
This feature triggers an AP to scan all supported channels. If you are not to locate devices on all channels, configure the channel scanning whitelist or blacklist. For more information about the channel scanning whitelist and blacklist, see "Configuring channel scanning."
Restrictions and guidelines
For an AP to send location packets to the location server, you must enable both AeroScout location and radio-based location.
Procedure
1. Enter system view.
system-view
2. Enter AP view, AP group view, or global configuration view.
¡ Enter AP view.
wlan ap ap-name
¡ Enter AP group view.
wlan ap-group group-name
¡ Enter global configuration view.
wlan global-configuration
3. Enable AeroScout location.
rfid-tracking aeroscout enable
By default:
¡ In AP view, an AP uses the configuration in AP group view. If no setting is configured in AP group view, the AP uses the configuration in global configuration view.
¡ In AP group view, an AP uses the configuration in global configuration view.
¡ In global configuration view, AeroScout location is disabled.
Enabling radio-based location
Restrictions and guidelines
For an AP to send location packets to the location server, you must enable both AeroScout location and radio-based location.
Procedure
1. Enter system view.
system-view
2. Enter AP view or an AP group's AP model view.
¡ Enter AP view.
wlan ap ap-name
¡ Execute the following commands in sequence to enter an AP group's AP model view:
wlan ap-group group-name
ap-model ap-model
3. Enter radio view.
radio radio-id
4. Enable radio-based location.
rfid-tracking radio enable
By default:
¡ In radio view, an AP uses the configuration in an AP group's radio view.
¡ In an AP group's radio view, radio-based location is disabled.
Specifying the AeroScout location mode
About this task
AeroScout location provides the following location modes:
· Dynamic location—An AP negotiates with the location server to obtain the multicast MAC address for Tags, packet dilution attributes, and the IP address and port number of the location server. The location server obtains the AP's AeroScout version, MAC address, radio mode, and channel information. Then the location server notifies the AP to send location packets.
· Static location—An AP gets predefined location attributes from the AC and then starts to send location packets to the location server. Use static AeroScout location if the location server does not support dynamic negotiation with an AP.
In dynamic AeroScout location, an AP saves the IP address and port number of the location server in the flash memory. It uses the information to report its IP change or reboot events so that the server can respond in time. The AP maintains such information as follows:
· The AP starts a 10-minute timer after receiving a set configuration message that contains the server information. If it receives another set configuration message within 10 minutes, the AP only updates the configuration information in the cache. When the timer expires, the AP saves the information in the flash memory.
· If an IP change or reboot event occurs within 10 minutes after the AP receives the first configuration message, no server information is saved in the flash memory. The AP does not send an IP change or reboot message to the location server.
Procedure
1. Enter system view.
system-view
2. Enter AP view, AP group view, or global configuration view.
¡ Enter AP view.
wlan ap ap-name
¡ Enter AP group view.
wlan ap-group group-name
¡ Enter global configuration view.
wlan global-configuration
3. Specify the AeroScout location mode.
rfid-tracking aeroscout engine-detection { dynamic | static }
By default:
¡ In AP view, an AP uses the configuration in AP group view. If no setting is configured in AP group view, the AP uses the configuration in global configuration view.
¡ In AP group view, an AP uses the configuration in global configuration view.
¡ In global configuration view, dynamic AeroScout location is used.
Specifying an IPv4 address and port number for the location server
About this task
This feature allows APs to send location packets to the specified IPv4 address and port number for communicating with the location server. This feature does not take effect when dynamic AeroScout location is used.
Procedure
1. Enter system view.
system-view
2. Enter AP view, AP group view, or global configuration view.
¡ Enter AP view.
wlan ap ap-name
¡ Enter AP group view.
wlan ap-group group-name
¡ Enter global configuration view.
wlan global-configuration
3. Specify an IPv4 address and a port number for the location server.
rfid-tracking aeroscout engine-address engine-address engine-port engine-port
By default:
¡ In AP view, an AP uses the configuration in AP group view. If no setting is configured in AP group view, the AP uses the configuration in global configuration view.
¡ In AP group view, an AP uses the configuration in global configuration view.
¡ In global configuration view, no IPv4 address and port number are specified for the location server.
Specifying a port to listen for messages from the location server
About this task
Perform this task to specify a port for an AP to listen for messages from the location server.
When static AeroScout location is configured, the AP does not respond to packets received from the specified port.
Procedure
1. Enter system view.
system-view
2. Enter AP view, AP group view, or global configuration view.
¡ Enter AP view.
wlan ap ap-name
¡ Enter AP group view.
wlan ap-group group-name
¡ Enter global configuration view.
wlan global-configuration
3. Specify a port to listen for messages from the location server.
rfid-tracking aeroscout vendor-port vendor-port-number
By default:
¡ In AP view, an AP uses the configuration in AP group view. If no setting is configured in AP group view, the AP uses the configuration in global configuration view.
¡ In AP group view, an AP uses the configuration in global configuration view.
¡ In global configuration view, the port to listen is port 1144.
Specifying a multicast MAC address for Tags
About this task
The destination MAC address of packets sent by Tags is the multicast MAC address defined by the manufacturer. Perform this task to specify the multicast MAC address for an AP to identify Tags.
Restrictions and guidelines
Perform this task when static AeroScout location is configured. This feature does not take effect when dynamic AeroScout location is used.
If you do not specify a multicast MAC address for Tags, an AP determines that all received 802.11 packets are from MUs.
Procedure
1. Enter system view.
system-view
2. Enter AP view, AP group view, or global configuration view.
¡ Enter AP view.
wlan ap ap-name
¡ Enter AP group view.
wlan ap-group group-name
¡ Enter global configuration view.
wlan global-configuration
3. Specify a multicast MAC address for Tags.
rfid-tracking aeroscout tag-multicast-address mac-address
¡ In AP view, an AP uses the configuration in AP group view. If no setting is configured in AP group view, the AP uses the configuration in global configuration view.
¡ In AP group view, an AP uses the configuration in global configuration view.
¡ In global configuration view, no multicast MAC address is specified for Tags.
Specifying the type of devices to locate
About this task
This feature enables an AP to send location information about only the specified type of devices to the location server.
Procedure
1. Enter system view.
system-view
2. Enter AP view or an AP group's AP model view.
¡ Enter AP view.
wlan ap ap-name
¡ Execute the following commands in sequence to enter an AP group's AP model view:
wlan ap-group group-name
ap-model ap-model
3. Enter radio view.
radio radio-id
4. Specify the type of devices to locate.
rfid-tracking mode { mu | tag }
By default:
¡ In radio view, an AP uses the configuration in an AP group's radio view.
¡ In an AP group's radio view, the type of devices to locate is not specified.
You can execute this command multiple times to configure an AP to locate both MUs and Tags.
Specifying the timestamp type
About this task
Upon receiving a wireless location packet, an AP adds an absolute timestamp or a relative timestamp to the location packet. An absolute timestamp represents the time elapsed since 1970. A relative timestamp represents the time elapsed since the AP started.
Tag packets can be encapsulated with only the relative time. Whether MU packets are encapsulated with the relative time or absolute time depends on the location server vendor. The location servers of some vendors support only the absolute time for MU packets.
Procedure
1. Enter system view.
system-view
2. Enter AP view, AP group view, or global configuration view.
¡ Enter AP view.
wlan ap ap-name
¡ Enter AP group view.
wlan ap-group group-name
¡ Enter global configuration view.
wlan global-configuration
3. Specify the timestamp type.
rfid-tracking aeroscout timestamp { absolute | relative }
By default:
¡ In AP view, an AP uses the configuration in AP group view. If no setting is configured in AP group view, the AP uses the configuration in global configuration view.
¡ In AP group view, an AP uses the configuration in global configuration view.
¡ In global configuration view, the timestamp type is relative.
Enabling MU location packet aggregation
About this task
By default, an AP reports an MU location packet to the location server immediately after the AP receives the packet. This consumes a lot of network resources.
This feature enables an AP to aggregate received MU location packets into one location packet, and report the aggregated packet to the location server at the specified intervals. If the size of the aggregated packet reaches 1400 bytes, the AP reports the packet immediately.
Restrictions and guidelines
This feature takes effect only when the AeroScout location mode is static.
Procedure
1. Enter system view.
system-view
2. Enter AP view, AP group view, or global configuration view.
¡ Enter AP view.
wlan ap ap-name
¡ Enter AP group view.
wlan ap-group group-name
¡ Enter global configuration view.
wlan global-configuration
3. Enable MU location packet aggregation and set the interval for reporting aggregated location packets.
rfid-tracking aeroscout aggregate-report interval interval
By default:
¡ In AP view, an AP uses the configuration in AP group view. If no setting is configured in AP group view, the AP uses the configuration in global configuration view.
¡ In AP group view, an AP uses the configuration in global configuration view.
¡ In global configuration view, an AP does not aggregate MU location packets.
Specifying the report mode for AeroScout location packets
About this task
Both the AC (centralized report) and APs (local report) can report location packets to the location server. In centralized report mode, APs need to send location packets to the AC first.
Procedure
1. Enter system view.
system-view
2. Enter AP view, AP group view, or global configuration view.
¡ Enter AP view.
wlan ap ap-name
¡ Enter AP group view.
wlan ap-group group-name
¡ Enter global configuration view.
wlan global-configuration
3. Specify the report mode for location packets.
rfid-tracking aeroscout report-mode { central | local }
By default:
¡ In AP view, an AP uses the configuration in AP group view. If no setting is configured in AP group view, the AP uses the configuration in global configuration view.
¡ In AP group view, an AP uses the configuration in global configuration view.
¡ In global configuration view, the local report mode is used.
Configuring RF fingerprinting
Enabling RF fingerprinting
Restrictions and guidelines
For an AP to send location packets to the location server, you must enable both RF fingerprinting and radio-based location.
Procedure
1. Enter system view.
system-view
2. Enter AP view, AP group view, or global configuration view.
¡ Enter AP view.
wlan ap ap-name
¡ Enter AP group view.
wlan ap-group group-name
¡ Enter global configuration view.
wlan global-configuration
3. Enable RF fingerprinting.
rfid-tracking fingerprint enable
By default:
¡ In AP view, an AP uses the configuration in AP group view. If no setting is configured in AP group view, the AP uses the configuration in global configuration view.
¡ In AP group view, an AP uses the configuration in global configuration view.
¡ In global configuration view, RF fingerprinting is disabled.
Enabling radio-based location
Restrictions and guidelines
For an AP to send location packets to the location server, you must enable both RF fingerprinting and radio-based location.
Procedure
1. Enter system view.
system-view
2. Enter AP view or an AP group's AP model view.
¡ Enter AP view.
wlan ap ap-name
¡ Execute the following commands in sequence to enter an AP group's AP model view:
wlan ap-group group-name
ap-model ap-model
3. Enter radio view.
radio radio-id
4. Enable radio-based location.
rfid-tracking radio enable
By default:
¡ In radio view, an AP uses the configuration in an AP group's radio view.
¡ In an AP group's radio view, radio-based location is disabled.
Specifying an IPv4 address and a port number for the location server
About this task
This feature enables APs to send location packets to the specified IPv4 address and port number for communicating with the location server.
Procedure
1. Enter system view.
system-view
2. Enter AP view, AP group view, or global configuration view.
¡ Enter AP view.
wlan ap ap-name
¡ Enter AP group view.
wlan ap-group group-name
¡ Enter global configuration view.
wlan global-configuration
3. Specify an IPv4 address and a port number for the location server.
rfid-tracking fingerprint engine-address engine-address engine-port engine-port
By default:
¡ In AP view, an AP uses the configuration in AP group view. If no setting is configured in AP group view, the AP uses the configuration in global configuration view.
¡ In AP group view, an AP uses the configuration in global configuration view.
¡ In global configuration view, no IPv4 address and port number are specified for the location server.
Specifying a port to listen for messages from the location server
About this task
Perform this task to specify a port for an AP to listen for messages from the location server.
Procedure
1. Enter system view.
system-view
2. Enter AP view, AP group view, or global configuration view.
¡ Enter AP view.
wlan ap ap-name
¡ Enter AP group view.
wlan ap-group group-name
¡ Enter global configuration view.
wlan global-configuration
3. Specify a port to listen for messages from the location server.
rfid-tracking fingerprint vendor-port vendor-port-number
By default:
¡ In AP view, an AP uses the configuration in AP group view. If no setting is configured in AP group view, the AP uses the configuration in global configuration view.
¡ In AP group view, an AP uses the configuration in global configuration view.
¡ In global configuration view, the port to listen is port 1144.
Specifying a multicast MAC address for Tags
About this task
The destination MAC address of packets sent by Tags is the multicast MAC address defined by the manufacturer. Perform this task to specify the multicast MAC address for an AP to identify Tags.
If you do not specify a multicast MAC address for Tags, an AP determines that all received 802.11 packets are from MUs.
Procedure
1. Enter system view.
system-view
2. Enter AP view, AP group view, or global configuration view.
¡ Enter AP view.
wlan ap ap-name
¡ Enter AP group view.
wlan ap-group group-name
¡ Enter global configuration view.
wlan global-configuration
3. Specify a multicast MAC address for Tags.
rfid-tracking fingerprint tag-multicast-address mac-address
By default:
¡ In AP view, an AP uses the configuration in AP group view. If no setting is configured in AP group view, the AP uses the configuration in global configuration view.
¡ In AP group view, an AP uses the configuration in global configuration view.
¡ In global configuration view, no multicast MAC address is specified for Tags.
Specifying the type of devices to locate
About this task
This feature enables an AP to send location information about only the specified type of devices to the location server.
Procedure
1. Enter system view.
system-view
2. Enter AP view or an AP group's AP model view.
¡ Enter AP view.
wlan ap ap-name
¡ Execute the following commands in sequence to enter an AP group's AP model view:
wlan ap-group group-name
ap-model ap-model
3. Enter radio view.
radio radio-id
4. Specify the type of devices to locate.
rfid-tracking mode { mu | tag } *
By default:
¡ In radio view, an AP uses the configuration in an AP group's radio view.
¡ In an AP group's radio view, the type of devices to locate is not specified.
Configuring raw frame reporting
About this task
This feature enables an AP to encapsulate both the raw frames and the location information obtained from the frames in location packets.
Procedure
1. Enter system view.
system-view
2. Enter AP view, AP group view, or global configuration view.
¡ Enter AP view.
wlan ap ap-name
¡ Enter AP group view.
wlan ap-group group-name
¡ Enter global configuration view.
wlan global-configuration
3. Configure raw frame reporting.
rfid-tracking fingerprint raw-frame-report { disable | enable }
By default:
¡ In AP view, an AP uses the configuration in AP group view. If no setting is configured in AP group view, the AP uses the configuration in global configuration view.
¡ In AP group view, an AP uses the configuration in global configuration view.
¡ In global configuration view, raw frame reporting is disabled.
Configuring MU information reporting
About this task
This feature enables an AP to encapsulate MU information, including the IP address and the transmit rate of an MU in location packets.
Procedure
1. Enter system view.
system-view
2. Enter AP view, AP group view, or global configuration view.
¡ Enter AP view.
wlan ap ap-name
¡ Enter AP group view.
wlan ap-group group-name
¡ Enter global configuration view.
wlan global-configuration
3. Configure MU information reporting.
rfid-tracking fingerprint mu-report { disable | enable }
By default:
¡ In AP view, an AP uses the configuration in AP group view. If no setting is configured in AP group view, the AP uses the configuration in global configuration view.
¡ In AP group view, an AP uses the configuration in global configuration view.
¡ In global configuration view, MU information reporting is disabled.
Specifying the location packet format
About this task
RF fingerprinting supports the following location packet formats:
· CUPID-hybrid—An AP encapsulates only clients' MAC addresses and RSSIs in location packets.
· General—This format is applicable to most scenarios. Most third-party location servers support only the general format.
· Light-weight—An AP encapsulates location information for several clients in one light-weight location packet to save bandwidth. This format is applicable to traffic-sensitive scenarios.
Procedure
1. Enter system view.
system-view
2. Enter AP view, AP group view, or global configuration view.
¡ Enter AP view.
wlan ap ap-name
¡ Enter AP group view.
wlan ap-group group-name
¡ Enter global configuration view.
wlan global-configuration
3. Specify the location packet format.
rfid-tracking fingerprint report-format { cupid-hybrid | general | light-weight }
By default:
¡ In AP view, an AP uses the configuration in AP group view. If no setting is configured in AP group view, the AP uses the configuration in global configuration view.
¡ In AP group view, an AP uses the configuration in global configuration view.
¡ In global configuration view, an AP sends location packets in general format.
Specifying the report mode for location packets
About this task
Both the AC (centralized report) and APs (local report) can report location packets to the location server. In centralized report mode, APs need to send location packets to the AC first.
Procedure
1. Enter system view.
system-view
2. Enter AP view, AP group view, or global configuration view.
¡ Enter AP view.
wlan ap ap-name
¡ Enter AP group view.
wlan ap-group group-name
¡ Enter global configuration view.
wlan global-configuration
3. Specify the report mode for location packets.
rfid-tracking fingerprint report-mode { central | local }
By default:
¡ In AP view, an AP uses the configuration in AP group view. If no setting is configured in AP group view, the AP uses the configuration in global configuration view.
¡ In AP group view, an AP uses the configuration in global configuration view.
¡ In global configuration view, the local report mode is used.
Configuring CUPID location
Enabling CUPID location
1. Enter system view.
system-view
2. Enter AP view, AP group view, or global configuration view.
¡ Enter AP view.
wlan ap ap-name
¡ Enter AP group view.
wlan ap-group group-name
¡ Enter global configuration view.
wlan global-configuration
3. Enable CUPID location.
rfid-tracking cupid enable
By default:
¡ In AP view, an AP uses the configuration in AP group view. If no setting is configured in AP group view, the AP uses the configuration in global configuration view.
¡ In AP group view, an AP uses the configuration in global configuration view.
¡ In global configuration view, CUPID location is disabled.
Specifying the CUPID location server
Restrictions and guidelines
You can specify a remote server or the AC as the location server for location calculation. If the AC is specified as the location server, centralized location packet report must be enabled, and unassociated clients cannot be located.
Procedure
1. Enter system view.
system-view
2. Enter AP view, AP group view, or global configuration view.
¡ Enter AP view.
wlan ap ap-name
¡ Enter AP group view.
wlan ap-group group-name
¡ Enter global configuration view.
wlan global-configuration
3. Specify the CUPID location server.
rfid-tracking cupid engine-address engine-address engine-port engine-port
By default:
¡ In AP view, an AP uses the configuration in AP group view. If no setting is configured in AP group view, the AP uses the configuration in global configuration view.
¡ In AP group view, an AP uses the configuration in global configuration view.
¡ In global configuration view, the CUPID location server is not specified.
Specifying a port to listen for messages from the location server
About this task
Perform this task to specify a port for an AP to listen for messages from the location server.
Procedure
1. Enter system view.
system-view
2. Enter AP view, AP group view, or global configuration view.
¡ Enter AP view.
wlan ap ap-name
¡ Enter AP group view.
wlan ap-group group-name
¡ Enter global configuration view.
wlan global-configuration
3. Specify a port to listen for messages from the location server.
rfid-tracking cupid vendor-port vendor-port-number
By default:
¡ In AP view, an AP uses the configuration in AP group view. If no setting is configured in AP group view, the AP uses the configuration in global configuration view.
¡ In AP group view, an AP uses the configuration in global configuration view.
¡ In global configuration view, the port to listen is port 1144.
Configuring client list reporting
About this task
A client can be located only when its associated AP is enabled with both CUPID location and client list reporting. After you enable client list reporting for an AP, the AP sends client list reports to the location server at the specified interval. The location server selects a group of location APs for each client based on the client list reports.
Procedure
1. Enter system view.
system-view
2. Enter AP view, AP group view, or global configuration view.
¡ Enter AP view.
wlan ap ap-name
¡ Enter AP group view.
wlan ap-group group-name
¡ Enter global configuration view.
wlan global-configuration
3. Enable the AP to send client list reports to the location server.
rfid-tracking cupid report enable
By default:
¡ In AP view, an AP uses the configuration in AP group view. If no setting is configured in AP group view, the AP uses the configuration in global configuration view.
¡ In AP group view, an AP uses the configuration in global configuration view.
¡ In global configuration view, client list reporting is disabled.
4. Set the interval for sending client list reports.
rfid-tracking cupid report interval interval
By default:
¡ In AP view, an AP uses the configuration in AP group view. If no setting is configured in AP group view, the AP uses the configuration in global configuration view.
¡ In AP group view, an AP uses the configuration in global configuration view.
¡ In global configuration view, the interval for sending client list reports is one second.
Configuring unassociated client information reporting
About this task
This feature enables an AP to report information about unassociated clients to the location server. Unassociated client information includes client MAC address, RSSI, and location measurement result.
Procedure
1. Enter system view.
system-view
2. Enter AP view, AP group view, or global configuration view.
¡ Enter AP view.
wlan ap ap-name
¡ Enter AP group view.
wlan ap-group group-name
¡ Enter global configuration view.
wlan global-configuration
3. Configure unassociated client information reporting.
rfid-tracking cupid unassociated-report { disable | enable }
By default:
¡ In AP view, an AP uses the configuration in AP group view. If no setting is configured in AP group view, the AP uses the configuration in global configuration view.
¡ In AP group view, an AP uses the configuration in global configuration view.
¡ In global configuration view, unassociated client information reporting is disabled.
Configuring unassociated client location
About this task
This feature enables an AP to perform a location measurement for an unassociated client upon receiving a probe request from the client.
Restrictions and guidelines
For an AP to send the location measurement result to the location server, you must enable unassociated client information reporting.
In a WLAN that has a large number of unassociated clients, also configure packet dilution to prevent frequent location measurements. For more information about packet dilution, see "Configuring packet dilution."
Procedure
1. Enter system view.
system-view
2. Enter AP view, AP group view, or global configuration view.
¡ Enter AP view.
wlan ap ap-name
¡ Enter AP group view.
wlan ap-group group-name
¡ Enter global configuration view.
wlan global-configuration
3. Configure unassociated client location.
rfid-tracking cupid unassociated-measurement { disable | enable }
By default:
¡ In AP view, an AP uses the configuration in AP group view. If no setting is configured in AP group view, the AP uses the configuration in global configuration view.
¡ In AP group view, an AP uses the configuration in global configuration view.
¡ In global configuration view, unassociated client location is enabled.
Specifying the location packet format
About this task
CUPID location supports the following location packet formats:
· General—This format is applicable to most scenarios. Most third-party location servers support only the general format.
· Light-weight—An AP encapsulates location information for several clients in one light-weight location packet to save bandwidth. This format is applicable to traffic-sensitive scenarios.
Procedure
1. Enter system view.
system-view
2. Enter AP view, AP group view, or global configuration view.
¡ Enter AP view.
wlan ap ap-name
¡ Enter AP group view.
wlan ap-group group-name
¡ Enter global configuration view.
wlan global-configuration
3. Specify the location packet format.
rfid-tracking cupid report-format { general | light-weight }
By default:
¡ In AP view, an AP uses the configuration in AP group view. If no setting is configured in AP group view, the AP uses the configuration in global configuration view.
¡ In AP group view, an AP uses the configuration in global configuration view.
¡ In global configuration view, location packets are in general format.
Specifying the report mode for location packets
About this task
Both the AC (centralized report) and APs (local report) can report location packets to the location server. In centralized report mode, APs need to send location packets to the AC first.
Procedure
1. Enter system view.
system-view
2. Enter AP view, AP group view, or global configuration view.
¡ Enter AP view.
wlan ap ap-name
¡ Enter AP group view.
wlan ap-group group-name
¡ Enter global configuration view.
wlan global-configuration
3. Specify the report mode for location packets.
rfid-tracking cupid report-mode { central | local }
By default:
¡ In AP view, an AP uses the configuration in AP group view. If no setting is configured in AP group view, the AP uses the configuration in global configuration view.
¡ In AP group view, an AP uses the configuration in global configuration view.
¡ In global configuration view, the local report mode is used.
Configuring wireless location common parameters
Configuring packet dilution
About this task
This feature enables an AP to send a location packet upon receiving the specific number of wireless packets or at the specified interval. This reduces the workloads of the location server and the AP.
For example, the dilution factor is 10 and the timeout timer is 5 seconds. Packet dilution operates as follows:
· If AeroScout location or RF fingerprinting is enabled, the AP sends a location packet every time it receives 10 wireless packets from an MU client (excluding management and broadcast packets). If the AP fails to receive 10 packets from an MU client before the timeout timer expires, it sends the most recent wireless packet to the location server.
· If CUPID location is enabled, the AP performs a location measurement every time it receives 10 probe requests from an unassociated client. If the AP fails to receive 10 probe requests from an unassociated client before the timeout timer expires, it performs a location measurement when the timer expires.
Restrictions and guidelines
This feature takes effect only on unassociated clients for CUPID location and MU clients for RF fingerprinting or static AeroScout location.
Procedure
1. Enter system view.
system-view
2. Enter AP view, AP group view, or global configuration view.
¡ Enter AP view.
wlan ap ap-name
¡ Enter AP group view.
wlan ap-group group-name
¡ Enter global configuration view.
wlan global-configuration
3. Enable packet dilution.
rfid-tracking dilution enable
By default:
¡ In AP view, an AP uses the configuration in AP group view. If no setting is configured in AP group view, the AP uses the configuration in global configuration view.
¡ In AP group view, an AP uses the configuration in global configuration view.
¡ In global configuration view, packet dilution is disabled.
4. Set the dilution factor and dilution timeout timer.
rfid-tracking dilution factor factor timeout timeout
By default:
¡ In AP view, an AP uses the configuration in AP group view. If no setting is configured in AP group view, the AP uses the configuration in global configuration view.
¡ In AP group view, an AP uses the configuration in global configuration view.
¡ In global configuration view, the dilution factor and dilution timeout timer are not configured.
Enabling ignoring beacon frames
About this task
Ignoring beacon frames prevents traffic flood.
Restrictions and guidelines
This feature takes effect only when AeroScout location or RF fingerprinting is configured.
Procedure
1. Enter system view.
system-view
2. Enter AP view, AP group view, or global configuration view.
¡ Enter AP view.
wlan ap ap-name
¡ Enter AP group view.
wlan ap-group group-name
¡ Enter global configuration view.
wlan global-configuration
3. Enable the AP to ignore beacon frames.
rfid-tracking ignore beacon enable
By default:
¡ In AP view, an AP uses the configuration in AP group view. If no setting is configured in AP group view, the AP uses the configuration in global configuration view.
¡ In AP group view, an AP uses the configuration in global configuration view.
¡ In global configuration view, beacon frames are not ignored.
Enabling ignoring AP frames
About this task
AP frames are frames that an AP received from other APs. Configure this feature if you do not need to locate or monitor APs.
Restrictions and guidelines
This feature takes effect only when AeroScout location or RF fingerprinting is configured.
Procedure
1. Enter system view.
system-view
2. Enter AP view, AP group view, or global configuration view.
¡ Enter AP view.
wlan ap ap-name
¡ Enter AP group view.
wlan ap-group group-name
¡ Enter global configuration view.
wlan global-configuration
3. Enable the AP to ignore AP frames.
rfid-tracking ignore ap-frame enable
By default:
¡ In AP view, an AP uses the configuration in AP group view. If no setting is configured in AP group view, the AP uses the configuration in global configuration view.
¡ In AP group view, an AP uses the configuration in global configuration view.
¡ In global configuration view, AP frames are not ignored.
Configuring RSSI-based packet filtering
About this task
When RSSI-based packet filtering is enabled, an AP does not report location information in packets with an RSSI lower than the RSSI threshold. This feature enables an AP to not locate clients far away from the AP.
Restrictions and guidelines
This feature takes effect only when AeroScout location or RF fingerprinting is configured.
Procedure
1. Enter system view.
system-view
2. Enter AP view, AP group view, or global configuration view.
¡ Enter AP view.
wlan ap ap-name
¡ Enter AP group view.
wlan ap-group group-name
¡ Enter global configuration view.
wlan global-configuration
3. Enable RSSI-based packet filtering.
rfid-tracking rssi enable
By default:
¡ In AP view, an AP uses the configuration in AP group view. If no setting is configured in AP group view, the AP uses the configuration in global configuration view.
¡ In AP group view, an AP uses the configuration in global configuration view.
¡ In global configuration view, RSSI-based packet filtering is disabled.
4. Set the RSSI threshold.
rfid-tracking rssi threshold rssi-threshold
By default:
¡ In AP view, an AP uses the configuration in AP group view. If no setting is configured in AP group view, the AP uses the configuration in global configuration view.
¡ In AP group view, an AP uses the configuration in global configuration view.
¡ In global configuration view, the RSSI threshold is 5 (–123 dBm).
Configuring client packet rate limiting
About this task
This feature enables an AP to not report location information from excessive client packets when both the CIR and CBS are exceeded. This practice ensures that the location information for each client can be sent to the location server and prevents client packets from flooding the AP.
Restrictions and guidelines
This feature takes effect only when AeroScout location or RF fingerprinting is configured.
If packet dilution is enabled, this feature limits the rate for diluted packets.
Procedure
1. Enter system view.
system-view
2. Enter AP view, AP group view, or global configuration view.
¡ Enter AP view.
wlan ap ap-name
¡ Enter AP group view.
wlan ap-group group-name
¡ Enter global configuration view.
wlan global-configuration
3. Enable client packet rate limiting.
rfid-tracking client rate-limit enable
By default:
¡ In AP view, an AP uses the configuration in AP group view. If no setting is configured in AP group view, the AP uses the configuration in global configuration view.
¡ In AP group view, an AP uses the configuration in global configuration view.
¡ In global configuration view, client packet rate limiting is disabled.
4. Set the CIR and CBS for client packets.
rfid-tracking client rate-limit cir cir [ cbs cbs ]
By default:
¡ In AP view, an AP uses the configuration in AP group view. If no setting is configured in AP group view, the AP uses the configuration in global configuration view.
¡ In AP group view, an AP uses the configuration in global configuration view.
¡ In global configuration view, the CIR and CBS for client packets are not set.
Configuring location packet rate limiting
About this task
This feature enables an AP to discard excessive location packets when both the CIR and CBS are exceeded. This practice prevents location packets from flooding the location server.
Restrictions and guidelines
This feature takes effect only when AeroScout location or RF fingerprinting is configured.
Procedure
1. Enter system view.
system-view
2. Enter AP view, AP group view, or global configuration view.
¡ Enter AP view.
wlan ap ap-name
¡ Enter AP group view.
wlan ap-group group-name
¡ Enter global configuration view.
wlan global-configuration
3. Enable location packet rate limiting.
rfid-tracking rate-limit enable
By default:
¡ In AP view, an AP uses the configuration in AP group view. If no setting is configured in AP group view, the AP uses the configuration in global configuration view.
¡ In AP group view, an AP uses the configuration in global configuration view.
¡ In global configuration view, location packet rate limiting is disabled.
4. Set the CIR and CBS for location packets.
rfid-tracking rate-limit cir cir [ cbs cbs ]
By default:
¡ In AP view, an AP uses the configuration in AP group view. If no setting is configured in AP group view, the AP uses the configuration in global configuration view.
¡ In AP group view, an AP uses the configuration in global configuration view.
¡ In global configuration view, the CIR and CBS for location packets are not set.
Configuring wireless location keepalive
About this task
This feature enables an AP to send Hello packets to the location server at an interval of 15 seconds. If the location server does not receive any packets from an AP within 30 seconds, the location server determines that the AP is offline.
Restrictions and guidelines
This feature takes effect only when RF fingerprinting or CUPID location is configured.
Disable this feature to avoid bandwidth waste if the location server cannot process Hello packets.
Procedure
1. Enter system view.
system-view
2. Enter AP view, AP group view, or global configuration view.
¡ Enter AP view.
wlan ap ap-name
¡ Enter AP group view.
wlan ap-group group-name
¡ Enter global configuration view.
wlan global-configuration
3. Configure wireless location keepalive.
rfid-tracking keepalive { disable | enable }
By default:
¡ In AP view, an AP uses the configuration in AP group view. If no setting is configured in AP group view, the AP uses the configuration in global configuration view.
¡ In AP group view, an AP uses the configuration in global configuration view.
¡ In global configuration view, wireless location keepalive is disabled.
Verifying and maintaining wireless location
Perform display tasks in any view.
· Display the state of wireless location methods.
display wlan ap all feature location-aware
· Display radio information for wireless location.
display wlan rfid-tracking radio [ ap apname ]
Wireless location configuration examples
Example: Configuring AeroScout location
Network configuration
As shown in Figure 2, configure wireless location on AP 1, AP 2, and AP 3 to locate the MU and the Tag.
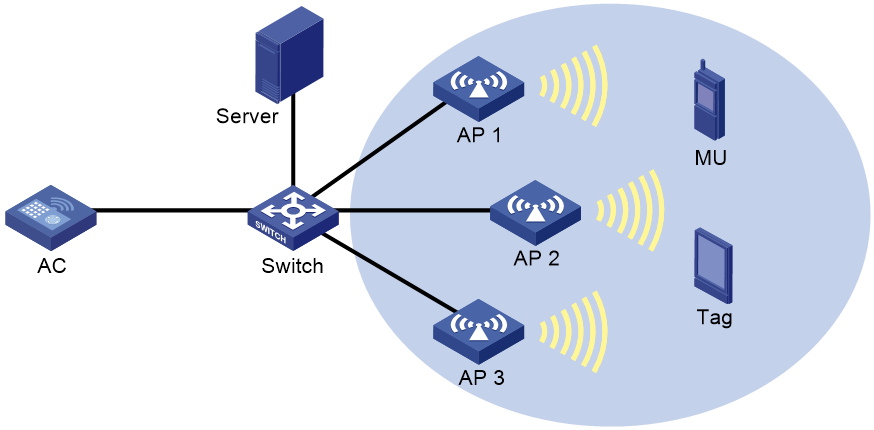
Procedure
1. Configure the location server:
¡ Set the IP addresses of the three APs on the location server, or configure the location server to discover APs through broadcast. (Details not shown.)
¡ Configure wireless location on the location server. (Details not shown.)
2. Configure the APs:
¡ Configure AP 1.
# Create manual AP ap1, and specify the AP model and serial ID.
<AC> system-view
[AC] wlan ap ap1 model WA6320
[AC-wlan-ap-ap1] serial-id 219801A28N819CE0002T
[AC-wlan-ap-ap1] quit
# Enable AeroScout location.
[AC-wlan-ap-ap1] rfid-tracking aeroscout enable
# Enable radio-based location.
[AC-wlan-ap-ap1] radio 1
[AC-wlan-ap-ap1-radio-1] rfid-tracking radio enable
# Specify the type of devices to locate as Tag.
[AC-wlan-ap-ap1-radio-1] rfid-tracking mode tag
# Specify the type of devices to locate as MU.
[AC-wlan-ap-ap1-radio-1] rfid-tracking mode mu
# Enable radio 1 of AP 1.
[AC-wlan-ap-ap1-radio-1] radio enable
[AC-wlan-ap-ap1-radio-1] quit
[AC-wlan-ap-ap1] quit
[AC] quit
¡ Configure AP 2 and AP 3 in the same way AP 1 is configured.
Verifying the configuration
# Verify that wireless location is enabled and the type of devices to locate is MU/Tag for each AP.
<AC> display wlan rfid-tracking radio
Wireless Locating
--------------------------------------------------------------------------------
AP Radio Type
--------------------------------------------------------------------------------
ap1 1 MU/Tag
ap2 1 MU/Tag
ap3 1 MU/Tag
--------------------------------------------------------------------------------
# Verify that you can view location information for the MU and the Tag by maps, forms or reports provided by the graphics software. (Details not shown.)
Example: Configuring RF fingerprinting
Network configuration
As shown in Figure 3, configure RF fingerprinting for AP 1, AP 2, and AP 3 to locate the MUs.
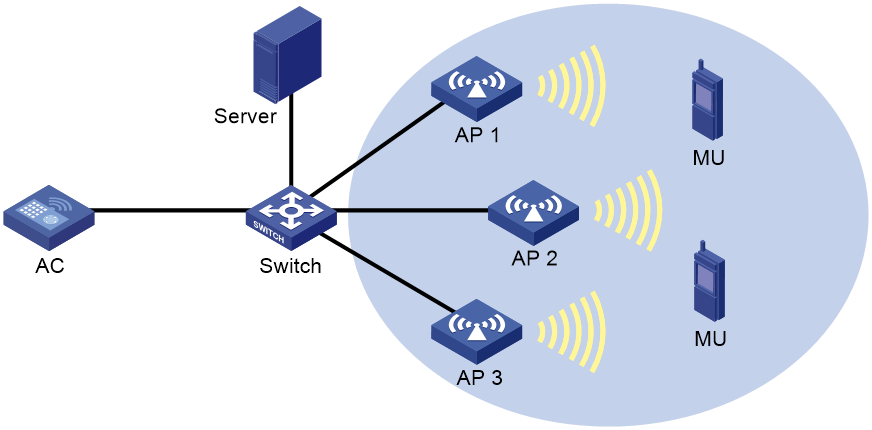
Procedure
1. Configure AP 1:
# Create manual AP ap1, and specify the AP model and serial ID.
<AC> system-view
[AC] wlan ap ap1 model WA6320
[AC-wlan-ap-ap1] serial-id 219801A28N819CE0002T
[AC-wlan-ap-ap1] quit
# Enable RF fingerprinting.
[AC-wlan-ap-ap1] rfid-tracking fingerprint enable
# Specify an IPv4 address and a port number for the location server.
[AC-wlan-ap-ap1] rfid-tracking fingerprint engine-address 192.168.10.10 engine-port 1145
# Specify a port to listen for messages from the location server.
[AC-wlan-ap-ap1] rfid-tracking fingerprint vendor-port 3000
# Enable radio-based location.
[AC-wlan-ap-ap1] radio 1
[AC-wlan-ap-ap1-radio-1] rfid-tracking radio enable
# Specify the type of devices to locate as MU.
[AC-wlan-ap-ap1-radio-1] rfid-tracking mode mu
# Enable radio 1 of AP 1.
[AC-wlan-ap-ap1-radio-1] radio enable
[AC-wlan-ap-ap1-radio-1] quit
[AC-wlan-ap-ap1] quit
[AC] quit
2. Configure AP 2 and AP 3 in the same way AP 1 is configured.
Verifying the configuration
# Verify that RF fingerprinting is enabled and the type of devices to locate is MU for each AP.
<AC> display wlan rfid-tracking radio
Wireless Locating
--------------------------------------------------------------------------------
AP Radio Type
--------------------------------------------------------------------------------
ap1 1 MU
ap2 1 MU
ap3 1 MU
--------------------------------------------------------------------------------
# Verify that you can view location information for the MUs by maps, forms, or reports provided by the graphics software. (Details not shown.)
Example: Configuring CUPID location
Network configuration
As shown in Figure 4, configure CUPID location for the APs to locate both associated and unassociated clients in the WLAN. Configure packet dilution to avoid frequent location measurements.
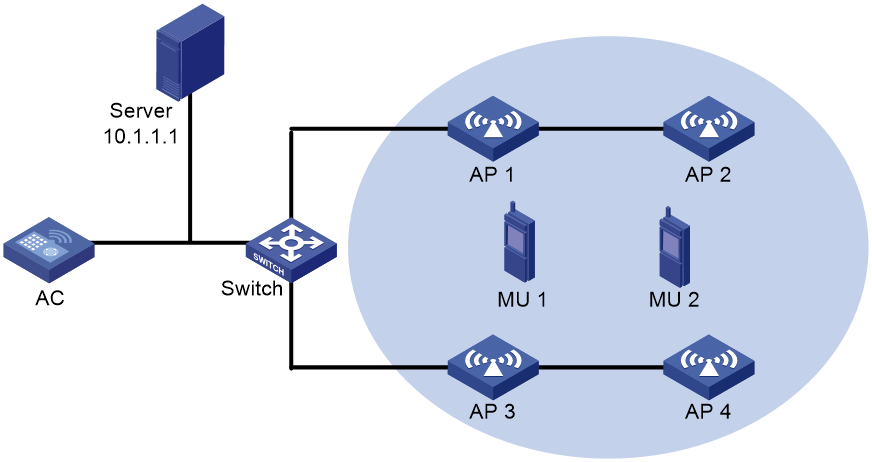
Procedure
1. Configure AP 1:
a. Create manual AP ap1, and specify the AP model and serial ID.
<AC> system-view
[AC] wlan ap ap1 model WA6320
[AC-wlan-ap-ap1] serial-id 219801A28N819CE0002T
[AC-wlan-ap-ap1] quit
b. Configure the wireless service:
# Create service template 1, set the SSID to market, and enable the service template.
[AC] wlan service-template 1
[AC-wlan-st-1] ssid market
[AC-wlan-st-1] service-template enable
[AC-wlan-st-1] quit
# Bind service template 1 to radio 1 of AP ap1, and enable radio 1.
[AC] wlan ap ap1
[AC-wlan-ap-ap1] radio 1
[AC-wlan-ap-ap1-radio-1] service-template 1
[AC-wlan-ap-ap1-radio-1] radio enable
[AC-wlan-ap-ap1-radio-1] quit
c. Configure CUPID location:
# Enable CUPID location.
[AC-wlan-ap-ap1] rfid-tracking cupid enable
# Set the IPv4 address and port number for the location server to 10.1.1.1 and 1145, respectively.
[AC-wlan-ap-ap1] rfid-tracking cupid engine-address 10.1.1.1 engine-port 1145
# Enable client list reporting for AP ap1, and set the interval for sending client list reports to 5 seconds.
[AC-wlan-ap-ap1] rfid-tracking cupid report enable
[AC-wlan-ap-ap1] rfid-tracking cupid report interval 5
# Enable unassociated client information reporting for AP ap1.
[AC-wlan-ap-ap1] rfid-tracking cupid unassociated-report enable
# Enable unassociated client location for AP ap1.
[AC-wlan-ap-ap1] rfid-tracking cupid unassociated-measurement enable
# Set the dilution factor and dilution timeout timer to 10 and 20 seconds, respectively.
[AC-wlan-ap-ap1] rfid-tracking dilution enable
[AC-wlan-ap-ap1] rfid-tracking dilution factor 10 timeout 20
2. Configure AP 2, AP 3, and AP 4 in the same way AP 1 is configured.