- Table of Contents
- Related Documents
-
| Title | Size | Download |
|---|---|---|
| 03-WLAN SAVI configuration | 162.90 KB |
Configuring basic WLAN IP snooping features
Configuring basic WLAN IP snooping features for IPv4
Configuring basic WLAN IP snooping features for IPv6
Display and maintenance commands for WLAN SAVI
WLAN SAVI configuration examples
Example: Configuring WLAN SAVI
Example: Configuring WLAN SAVI for client roaming center
Configuring WLAN SAVI
About WLAN SAVI
WLAN Source Address Validation Improvement (SAVI) prevents spoofing attacks by using WLAN snooping entries to filter packets received by an AP. It drops packets that do not match the entries. For more information about WLAN IP snooping, see User Access and Authentication Configuration Guide.
WLAN snooping is enabled by default on the AP. A WLAN snooping entry is an IP-MAC binding.
· In an IPv4 network, WLAN snooping reads the clients' IP-MAC bindings from the ARP messages or DHCP packets that pass through the AP. WLAN SAVI uses only the WLAN snooping entries obtained through DHCP packets.
· In an IPv6 network, WLAN snooping reads the clients' IP-MAC bindings from packets that pass through the AP. The packets are RA messages, NS messages, NA messages, and DHCP packets. WLAN SAVI uses all WLAN snooping entries for packet filtering.
For information about DHCP, DHCPv6, and ND, see Network Connectivity Configuration Guide.
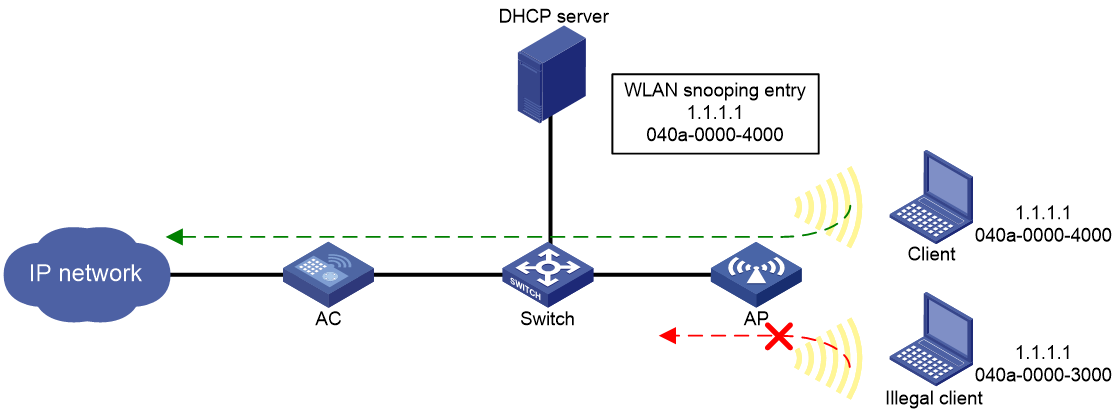
As shown in Figure 1, the AP has a WLAN snooping entry for the client that has obtained an IP address from the DHCP server. WLAN SAVI forwards packets only from the legal client.
Figure 1 WLAN SAVI application
WLAN SAVI tasks at a glance
To configure SAVI, perform the following tasks:
1. Configuring basic WLAN IP snooping features
Configuring basic WLAN IP snooping features
Configure WLAN IP snooping features based on the method through which clients obtain IP addresses. For more information about WLAN IP snooping, see Network Access and Authrntication Configuration Guide.
Configuring basic WLAN IP snooping features for IPv4
1. Enable snooping DHCP packets.
2. (Optional.) Disable snooping ARP packets.
3. (Optional.) Enable IP address recovery for reassociated clients.
Configuring basic WLAN IP snooping features for IPv6
1. Enable snooping DHCPv6 packets.
To learn IPv6 addresses only through DHCPv6 packets, enable this feature only.
2. Enable snooping ND packets.
To learn IPv6 addresses only through ND packets, enable this feature only.
3. (Optional.) Enable IP address recovery for reassociated clients.
Configuring WLAN SAVI
Restrictions and guidelines
WLAN SAVI enabled for a service template filters only packets from the clients in the BSSs created based on the service template. It does not affect clients in other BSSs.
Procedure
1. Enter system view.
system-view
2. Enter service template view.
wlan service-template service-template-number
3. Enable WLAN SAVI.
IPv4:
ip verify source [ alarm-only ]
IPv6:
ipv6 verify source [ alarm-only ]
By default, the WLAN SAVI feature is disabled.
Display and maintenance commands for WLAN SAVI
Execute display commands in any view.
|
Task |
Command |
|
Display IPv4SG bindings. |
display ip source binding [ wlan-snooping ] [ ip-address ip-address ] [ mac-address mac-address ] [ vlan vlan-id ] |
|
Display IPv6SG bindings. |
display ipv6 source binding [ wlan-snooping ] [ ip-address ipv6-address ] [ mac-address mac-address ] [ vlan vlan-id ] |
WLAN SAVI configuration examples
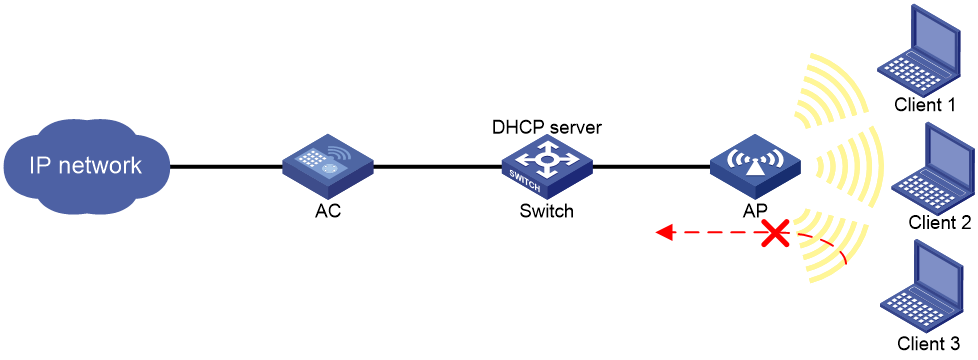
Example: Configuring WLAN SAVI
Network configuration
As shown in Figure 2, the clients access the WLAN through SSID service. Client 1 and Client 2 obtain IP addresses through the DHCP server (the switch).
Enable WLAN SAVI for the service template on the AC to make the AP filter incoming packets. The AP forwards the packets only from Client 1 and Client 2.
Procedure
# Create service template 1.
<AC> system-view
[AC] wlan service-template 1
# Set the SSID to service for the service template, and enable the service template.
[AC-wlan-st-1] ssid service
[AC-wlan-st-1] service-template enable
# Enable the WLAN SAVI feature for IPv4.
[AC-wlan-st-1] ip verify source
[AC-wlan-st-1] quit
# Create AP ap1, and specify the AP model and serial ID.
[AC] wlan ap ap1 model WA6320
[AC-wlan-ap-ap1] serial-id 219801A28N819CE0002T
# Enter radio view of radio 2 and bind service template 1 to radio 2.
[AC-wlan-ap-ap1] radio 2
[AC-wlan-ap-ap1-radio-2] service-template 1
[AC-wlan-ap-ap1-radio-2] quit
[AC-wlan-ap-ap1] quit
Verifying the configuration
# Use Client 1 and Client 2 to obtain their IP addresses through DHCP, and manually assign Client 3 the IP address of Client 1. (Details not shown.)
# Verify that packets from Client 1 and Client 2 are allowed to pass. (Details not shown.)
# Verify that packets from client 3 are dropped. (Details not shown.)
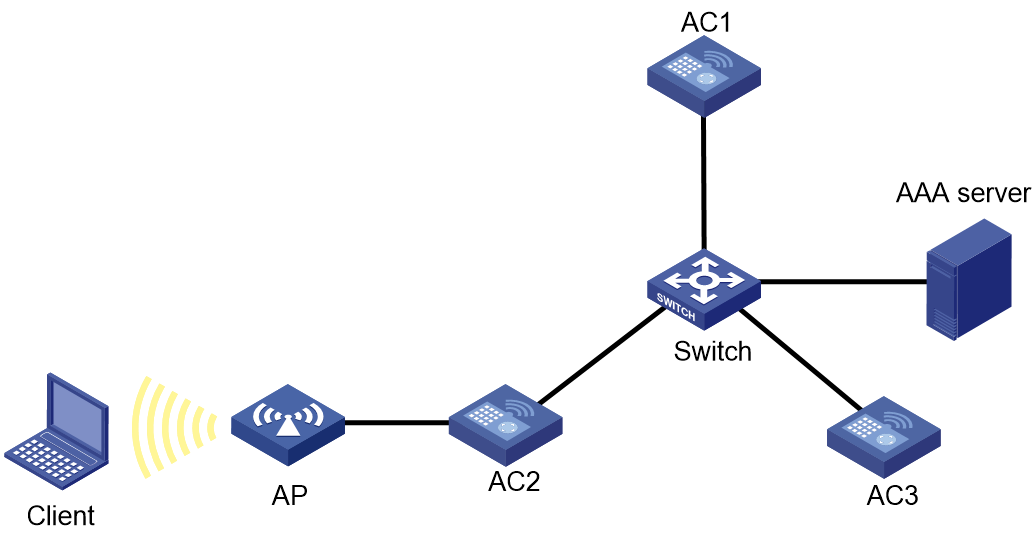
Example: Configuring WLAN SAVI for client roaming center
Network configuration
As shown in Figure 3, AC 1 acts as the WLAN roaming center, and AC 2 and AC 3 act as client roaming centers. The client comes online from the AP after passing 802.1X authentication. Configure the system to perform SAVI checks on client traffic received by the AP after the client comes online from AC 2 or AC 3.
Network diagram
Configuring AC 2 (client roaming center)
1. Assign IP address to device interfaces. Make sure the AC and the authentication server can reach each other. (Details not shown.)
2. Configure the RADIUS scheme:
# Create a RADIUS scheme named rs1 and enter its view.
<AC2> system-view
[AC2] radius scheme rs1
# Specify the primary authentication server and primary accounting server and specify the authentication and accounting keys.
[AC2-radius-rs1] primary authentication 192.168.0.112
[AC2-radius-rs1] primary accounting 192.168.0.112
[AC2-radius-rs1] key authentication simple radius
[AC2-radius-rs1] key accounting simple radius
# Configure the device to exclude domain names in usernames sent to the RADIUS server.
[AC2-radius-rs1] user-name-format without-domain
[AC2-radius-rs1] quit
3. Configure the authentication domain:
# Create an ISP domain named dm1 and enter its view.
[AC2] domain dm1
# Configure the AAA methods for the ISP domain.
[AC2-isp-dm1] authentication lan-access radius-scheme rs1
[AC2-isp-dm1] authorization lan-access radius-scheme rs1
[AC2-isp-dm1] accounting lan-access radius-scheme rs1
[AC2-isp-dm1] quit
4. Configure 802.1X authentication:
# Configure 802.1X authentication to use the EAP relay method.
[AC2] dot1x authentication-method eap
# Create AP ap2 and specify the AP model and serial number.
[AC2] wlan ap ap2 model WA6320
[AC2-wlan-ap-ap2] serial-id 219801A28N819CE0002T
[AC2-wlan-ap-ap2] quit
# Configure a service template and specify the SSID as newst.
[AC2] wlan service-template newst
[AC2–wlan-st-newst] ssid newst
# Configure RSN and 802.1X authentication for the service template.
[AC2–wlan-st-newst] client-security authentication-mode dot1x
[AC2–wlan-st-newst] akm mode dot1x
[AC2–wlan-st-newst] cipher-suite ccmp
[AC2–wlan-st-newst] security-ie rsn
[AC2–wlan-st-newst] dot1x domain dm1
# Disable snooping ARP packets.
[AC2–wlan-st-newst] undo client ipv4-snooping arp-learning enable
# Enable snooping DHCPv6 packets.
[AC2–wlan-st-newst] client ipv6-snooping dhcpv6-learning enable
# Enable snooping ND packets.
[AC2–wlan-st-newst] client ipv6-snooping nd-learning enable
# Enable WLAN SAVI.
[AC2–wlan-st-newst] ip verify source
[AC2–wlan-st-newst] ipv6 verify source
# Enable IP address recovery for reassociated clients.
[AC2–wlan-st-newst] client ip-snooping ip-recover enable
# Enable wireless service template newst.
[AC2–wlan-st-newst] service-template enable
[AC2–wlan-st-newst] quit
# Enable radio 2 and bind wireless service template newst to radio 2.
[AC2] wlan ap ap2
[AC2-wlan-ap-ap2] radio 2
[AC2-wlan-ap-ap2-radio-2] radio enable
[AC2-wlan-ap-ap2-radio-2] service-template newst
[AC2-wlan-ap-ap2-radio-2] quit
[AC2-wlan-ap-ap2] quit
5. Configure the client roaming center:
# Create a client roaming center and enter its view.
[AC2] client roaming-center
# Specify the IP address of the WLAN roaming center.
[AC2-client-roaming-center] wlan-roaming-center ip 192.168.1.1
# Enable the client roaming center.
[AC2-client-roaming-center] roaming-center enable
[AC2-client-roaming-center] quit
Configuring AC 3
Configure AC 3 in the same way in which AC 2 was configured.
Configuring AC 1 (WLAN roaming center)
# Create the WLAN roaming center and enter its view.
<AC1> system-view
[AC1] wlan roaming-center
# Enable the WLAN roaming center.
[AC1-wlan-roaming-center] roaming-center enable
[AC1-wlan-roaming-center] quit
