- Table of Contents
- Related Documents
-
| Title | Size | Download |
|---|---|---|
| 01-Text | 607.70 KB |
U-Center 2.0 deployment procedure at a glance
Installing U-Center 2.0 applications
Installing and obtaining licenses
Backing up U-Center 2.0 components
Restoring U-Center 2.0 components
Shutting down and powering off servers
Shutting down and powering off part of nodes
Shutting down and powering off all nodes
Starting servers and checking the network
Overview
With an advanced containerized microservice architecture, U-Center 2.0 provides clustering and high availability capabilities, features easy deployment, and supports large-scale data storage. Based on the architecture, U-Center 2.0 integrates the monitoring, CMDB, automation, IT process management, and service management components to form a unified operations and maintenance (O & M) platform.
In the containerized microservice architecture, the installation and deployment of different components might vary. This document provides streamlined installation and deployment guidelines for correct deployment of U-Center 2.0.
U-Center 2.0 deployment procedure at a glance
U-Center 2.0 contains CMDB, IOM, BSM, ITSM, AOM, and STM. It supports standalone-mode deployment with one master node and cluster-mode deployment with three master nodes. The deployment in cluster mode supports adding worker nodes for capacity expansion. The standalone mode can be smoothly expanded to cluster mode.
Table 1 shows the deployment workflow.
Table 1 U-Center 2.0 deployment workflow
|
Step |
Actions |
Remarks |
|
Prepare servers. |
· The standalone mode requires one server. · The cluster mode requires a minimum of three servers. |
Required.For hardware and software requirements, see "Server requirements." |
|
Install an operating system and associated packages. |
Install an operating system and associated packages on the servers. |
Required.For more information, see H3C Unified Platform Deployment Guide. |
|
Deploy Unified Platform. |
Configure cluster parameters. |
Required.For more information, see H3C Unified Platform Deployment Guide. |
|
Create a cluster. |
Required.For more information, see H3C Unified Platform Deployment Guide. |
|
|
Deploy Unified Platform installation packages. |
Required.For more information, see "Installing U-Center 2.0 applications." |
|
|
Deploy CMDB. |
Deploy CMDB installation packages. |
Optional.For more information, see "Installing U-Center 2.0 applications." |
|
Deploy IOM. |
Deploy IOM installation packages. |
Optional.For more information, see "Installing U-Center 2.0 applications." |
|
Deploy BSM. |
Deploy BSM installation packages. |
Optional.For more information, see "Installing U-Center 2.0 applications." |
|
Deploy ITSM. |
Deploy ITSM installation packages.
|
Optional.For more information, see "Installing U-Center 2.0 applications." |
|
Deploy AOM. |
Deploy AOM installation packages. |
Optional.For more information, see "Installing U-Center 2.0 applications." |
|
Deploy STM. |
Deploy STM installation packages. |
Optional.For more information, see "Installing U-Center 2.0 applications." |
Preparing for deployment
IP address assignment
|
|
IMPORTANT: Deploy the environment and make sure that: · The IP addresses of all the nodes can communicate with the internal virtual IP address of the cluster or northbound service virtual IP address. · The internal IP addresses of all the nodes can communicate with one another, including the IP addresses in the service IP pool and content IP pool. |
Table 2 shows the IP address assignment for U-Center 2.0 deployment. Only IPv4 addresses are supported.
|
IP address |
Description |
Remarks |
|
Master node 1 IP |
IP address assigned to the master node installed with H3Linux OS. |
Required. (The standalone mode requires deploying only one master node.) IP addresses of master nodes in one cluster must be on the same subnet. If multiple physical NICs exist on a node, make sure IP addresses are assigned to all physical NICs before the NIC whose IP is used as the node IP in the Matrix cluster. If this condition is not met, the cluster will fail to be deployed, upgraded, or rebuilt. For example, if the node uses the IP address of NIC ens191 as the node IP in the Matrix cluster, and ens190 is before ens191 in order, make sure ens190 has an IP address assigned. To view the NIC order, execute the ifconfig command. |
|
Master node 2 IP |
IP address assigned to the master node installed with H3Linux OS. |
|
|
Master node 3 IP |
IP address assigned to the master node installed with H3Linux OS. |
|
|
Cluster internal VIP |
IP address used for the communications within the cluster. |
Required. Internal virtual IP address of the cluster must be on the same subnet as the master nodes’ IP addresses. |
|
Northbound service VIP |
The unified application IP address for external access deployed through Matrix. |
Required. The northbound service VIP must be on the same subnet as the subnet of the master nodes. |
|
Worker node IP addresses |
IP address assigned to a worker node. |
Optional. This IP address must be on the same subnet as those of the master nodes. If multiple physical NICs exist on a node, make sure IP address are assigned to all physical NICs before the NIC whose IP address is used as the node IP in the Matrix cluster. If this condition is not met, the cluster will fail to be deployed, upgraded, or rebuilt. For example, if the node uses the IP address of NIC ens191 as the node IP in the Matrix cluster, and ens190 is before ens191 in order, make sure ens190 has an IP address assigned. To view the NIC order, execute the ifconfig command. |
Installation packages
|
Name |
Description |
Product package |
Remarks |
Dependencies |
|
common_Linux-<version>.iso |
Installation package of the H3Linux OS. |
PLAT |
Required. |
N/A |
|
common_PLAT_GlusterFS_2.0_<version>.zip |
Installation package for the local shared storage. |
PLAT |
Required. |
N/A |
|
general_PLAT_portal_2.0_<version>.zip |
Installation package for the portal, unified authentication, user management, service gateway, and help center modules. |
PLAT |
Required. |
N/A |
|
general_PLAT_kernel_2.0_<version>.zip |
Installation package for the access control, resource identification, configuration center, resource group, and log functionalities. |
PLAT |
Required. |
N/A |
|
general_PLAT_kernel-base_2.0_<version>.zip |
Installation package for alarm, access parameter template, monitoring template, report, and email- or SMS-based forwarding modules. |
PLAT |
Required. |
N/A |
|
general_PLAT_Dashboard_2.0_<version>.zip |
Installation package for dashboard framework |
PLAT |
Required. |
kernel-base |
|
general_PLAT_widget_2.0_<version>.zip |
Installation package for platform dashboard widget |
PLAT |
Required. |
Dashboard |
|
general_PLAT_kernel-region_2.0_<version>.zip |
Installation package for hierarchical management service. |
PLAT |
Optional. |
kernel-base |
|
general_PLAT_network_2.0_<version>.zip |
Installation package for basic network management (network resources, network performance, network topology, and iCC) |
PLAT |
Optional. |
kernel-base |
|
general_PLAT_cmdb_2.0_<version>.zip |
Installation package for configuration management database. |
PLAT |
Optional. |
kernel-base |
|
general_PLAT_suspension_2.0_<version>.zip |
Installation package for the resource maintenance tag task service. |
PLAT |
Optional. |
N/A |
|
Syslog_<version>.zip |
Installation package for the syslog service. |
PLAT |
Optional. |
N/A |
|
general_PLAT_aggregation_2.0_<version>.zip |
Installation package for the alarm aggregation service. |
PLAT |
Optional. |
kernel-base |
|
general_PLAT_oneclickcheck_2.0-<version>.zip |
Installation package for health inspection services. |
PLAT |
Recommended. |
N/A |
|
general_PLAT_network-ext_2.0_<version>.zip |
Installation package for network expansion services. |
PLAT |
Optional. |
N/A |
|
UCP-<version>.zip |
Installation package for the U-Center public platform component service. |
IOM |
Required. |
Dashboard |
|
COLLECTPLAT-<version>.zip |
Installation package for the collection platform service. |
IOM |
Optional. |
N/A |
|
IOM-<version>.zip |
Installation package for the application monitor service. |
IOM |
Optional. |
COLLECTPLAT |
|
ADDM-<version>.zip |
Installation package for the auto discovery service. |
IOM |
Optional. |
COLLECTPLAT |
|
AGENT-<version>.zip |
Installation package for the agent service. |
IOM |
Optional. |
IOM |
|
AGENT_RECEIVER-<version>.zip |
Installation package for the agent receiver. |
IOM |
Optional. |
AGENT |
|
AGENT_UPDATER-<version>.zip |
Installation package for agent upgrade. |
IOM |
Optional. |
AGENT |
|
BSM-<version>.zip |
Installation package for service health analysis. |
BSM |
Optional. |
IOM, CMDB |
|
UEM-<version>.zip |
Installation package for user experience analysis. |
BSM |
Optional. |
BSM |
|
ITSM-<version>.zip |
Installation package for process management. |
BSM |
Optional. |
N/A |
|
NTA-<version>.zip |
Installation package for traffic monitoring. |
BSM |
Optional. |
network, UCP, COLLECTPLAT |
|
STM-<version>.zip |
Installation package for Synthetic Transaction Monitor (STM). |
STM |
Optional. |
IOM, COLLECTPLAT |
|
NQA-<version>.zip |
Installation package for dialing test task management. |
STM |
Optional. |
IOM, network |
|
U-Center-AOM-SPLUS-<version>.zip |
Installation package for basic platform, INI, IPMS, CCMS, and OMTS. |
AOM |
Optional. |
network, UCP |
|
U-Center-AOM-PROBE-<version>.zip |
Collection client Web service |
AOM |
Optional. |
N/A |
Server requirements
Hardware requirements
For the hardware requirements in various application scenarios, see the hardware configuration guide for U-Center 2.0, or contact H3C Support.
Software requirements
Table 4 Operating system requirement
|
Operating system |
Version |
Kernel version |
|
H3Linux |
V1.1.2 |
3.10 |
|
|
IMPORTANT: You must install the same operating system version on all nodes in a cluster. |
Client requirements
You can use a browser to access U-Center 2.0 without installing client software. As a best practice, use Google Chrome 70 or Firefox 78 or higher with a minimum resolution width of 1600 pixels.
Pre-installation checklist
Table 5 shows the check list for the installation requirements. Make sure the U-Center 2.0 installation requirements are met.
Table 5 Pre-installation checklist
|
Item |
Requirements |
|
|
Server or VM |
Hardware |
The CPU, memory, disk, and NIC settings are as required. |
|
Software |
· The operating system meets the requirements. · The system time settings are configured correctly. As a best practice, configure NTP on each node to ensure time synchronization on the network, and make sure the NTP server time is the same as the current time. · RAID is configured. |
|
|
Client |
Make sure the browser version meets the requirement. |
|
|
To view the compatibility matrix between H3C servers and operating systems, click http://www.h3c.com/en/home/qr/default.htm?id=65 |
||
|
|
IMPORTANT: · As a best practice, set the mode to UEFI for the next startup of the server or VM. Select EFI from the boot firmware list. Do not select Enable UEFI secure boot for the VM. · Do not use KVM to install the same image for multiple servers when installing an operating system. · H5 KVM is unstable in performance and issues such as slow or unsuccessful image loading might occur during installation. As a best practice, use Java KVM to install the image. · A power failure during the installation process might cause installation failure of some service components. For function integrity, perform a reinstallation when a power failure occurs during installation. · Do not enable or disable firewalls during the U-Center 2.0 deployment. · To avoid cluster exceptions, do not edit the system time after the completion of cluster deployment. |
Software package verification
Before installing the software, first perform MD5 verification on each software package to ensure its integrity and correctness.
Installing U-Center 2.0
Installing Unified Platform
To install U-Center 2.0, install Unified Platform first. Then deploy U-Center 2.0 components in Unified Platform. For more information, see H3C Unified Platform Deployment Guide.
Installing U-Center 2.0 applications
Uploading installation packages
1. Use the browser to visit https://ip_address:8443/matrix/ui, and then enter the default username and password (or the user-defined username and password) to log in to the Matrix. Replace ip_address with the northbound service VIP.
2. On the top navigation bar, click DEPLOY.
3. From the navigation pane, select Applications.
4. Select Clusters from the navigation pane (to configure a cluster when no clusters have been configured).
5. Click the Cluster Parameters tab (to set the cluster parameters, which are required before cluster deployment).
6. On the page that opens, configure the cluster parameters:
¡ Cluster Internal VIP: Specify the IP address used for intra-cluster communication.
¡ Northbound Service VIP: Specify the unified application IP address for external access deployed through Matrix.
¡ Service IP Pool: Use the default setting.
¡ Container IP Pool: Use the default setting.
¡ Cluster Network Mode: Options include Single Subnet, Multi Subnet, and Single Subnet-VXLAN. The default setting is Single Subnet.
¡ NTP Server: Options include Inner and External. The default setting is External.
¡ External DNS Server: Specify whether to use an external DNS server.
¡ Self-Defined VIPs: Specify whether to use self-defined VIPs.
7. Click Apply.
8. Click the Deploy Cluster tab. On the page that opens, configure one or multiple master nodes and configure worker nodes as needed. In standalone mode, worker nodes are not supported.
9. Click Start Deployment.
10. On the page that opens, click ![]() .
.
11. On the page that opens, click the ![]() icon.
In the window that opens, upload application installation packages.
icon.
In the window that opens, upload application installation packages.
Upload and install the required installation packages in the following sequence:
a. common_PLAT_GlusterFS_2.0_<version>.zip
b. general_PLAT_portal_2.0_<version>.zip
c. general_PLAT_kernel_2.0_<version>.zip
d. general_PLAT_kernel-base_2.0_<version>.zip
e. general_PLAT_Dashboard_2.0_<version>.zip
f. general_PLAT_widget_2.0_<version>.zip
g. UCP-<version>.zip
After installing the required packages, install optional packages as needed. Before installing a package, install its dependencies first. For more information about dependencies, see Table 3.
|
|
IMPORTANT: · GlusterFS, portal, and kernel are required installation packages for Unified Platform. If the packages have been installed during Unified Platform deployment, you do not need to install them again. · If you want to use the upper-level and lower-level functions, install general_PLAT_kernel-region. · You can select and install all of the following packages simultaneously: UCP, COLLECTPLAT, IOM, ADDM, AGENT, AGENT_RECEIVER, and AGENT_UPDATER. · You can select and install all of the following packages simultaneously: BSM, UEM, STM, and NQA. NTA and ITSM require a separate installation and cannot be selected simultaneously with other packages. · To install the NTA application, you must install NTA, network, UDP, and COLLECTPLAT packages in the following order: network, UCP, COLLECTPLAT, NTA. · For AOM-SPLUS, install the splusini, splusipms, splusccms, and splusomts service modules separately in multiple steps as a best practice if the environment performance is low or disk read/write speed is slow. · For AOM-PROBE, you can specify the number of splusprobes to be installed as needed. As a best practice, add one probe for every 1000 devices. You must select at least one- probe. · The dashboard and widget applications are required for the dashboard function. The dashboard application must be installed before the widget application. · To use HTTPS, log in to Unified Platform after the applications and components are installed and then select System > System Settings > Security Settings to enable HTTPS. · After completing installation package upload, the system automatically synchronizes the installation packages to the following directory of each node: /opt/matrix/app/install/packages/ |
Installing the GlusterFS application
|
|
CAUTION: · To avoid installation failures, do not format the disk prepared for GlusterFS. If the disk has been formatted, use the wipefs -a /dev/disk name command to wipe the disk. · If an error message is displayed when you execute this command, wait for a while and then execute this command again. |
1. On the Select Application page, select common_PLAT_GlusterFS_2.0_<version>.zip, and then click Next.
2. Select applications and click Next.
All applications are selected by default.
3. On the shared storage configuration page, click Next.
GlusterFS does not support shared storage configuration.
4. On the database configuration page, click Next.
GlusterFS does not support database configuration.
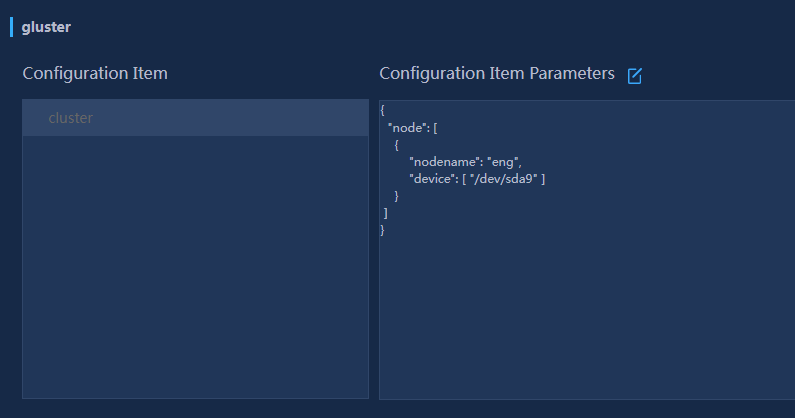
5. On the parameter configuration page, configure the parameters as shown in Figure 1.
Figure 1 Parameter configuration page
|
|
IMPORTANT: Use the lsblk command to view the disk partition. Make sure the selected disk or partition is not mounted or in use, and the disk space is more than 200 GB. (For U-Center 2.0 (E0704), make sure the disk space is more than 250G.) If no disk or partition meets the requirement, create a new one. For more information, see "How can I prepare a disk partition for GlusterFS on a node?." |
6. Click the ![]() icon, edit the
following parameters, and then click OK.
icon, edit the
following parameters, and then click OK.
¡ nodename—Specify the host name of the node server.
¡ device—Specify the name of the disk or partition on which GlusterFS is to be installed.
- To install GlusterFS on an empty disk, enter the name of the disk.
- To install GlusterFS on an empty partition, enter the name of the partition.
7. Click Deploy.
Installing the portal application
1. On the Select Application page, select general_PLAT_portal_2.0_<version>.zip, and click Next.
2. Select applications and click Next.
All applications are selected by default.
3. On the shared storage configuration page, click Next.
4. On the database configuration page, click Next.
¡ Unified Platform supports HTTPS. The ServiceProtocol field is HTTP by default, and can be modified to HTTPS.
¡ Change the port number as needed.
¡ To deploy an English environment, set Language to en_US.
5. On the parameter configuration page, configure the parameters as shown in Figure 2.
Edit service port number as needed on the parameter configuration page.
Figure 2 Parameter configuration page
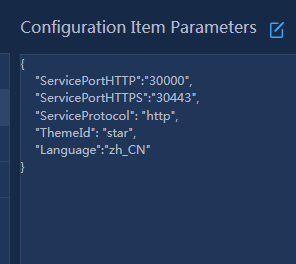
6. Click Deploy.
Installing the kernel application
1. On the Select Application page, select general_PLAT_kernel_2.0_<version>.zip, and then click Next.
2. Select applications and click Next.
All applications are selected by default.
3. On the shared storage configuration page, click Next.
4. On the database configuration page, click Next.
5. On the parameter configuration page, configure the parameters as shown in Figure 3. You can modify the ES values in an environment where the Kernel application has been installed or when upgrading the Kernel application. For more information, see "How can I manually modifying the ES values in the back end?."
Set Elasticsearch memory usage settings as needed.
Figure 3 Elasticsearch memory usage settings

6. Click Deploy.
Installing the kernel-base application
1. On the Select Application page, select general_PLAT_kernel-base_2.0<version>.zip, and then click Next.
2. Select applications and click Next.
All applications are selected by default.
3. On the shared storage configuration page, click Next.
4. On the database configuration page, click Next.
5. On the parameter configuration page, click Deploy.
Installing the dashboard application
1. On the Select Application page, select general_PLAT_Dashboard_2.0_<version>.zip, and then click Next.
2. Select applications and click Next.
All applications are selected by default.
3. On the shared storage configuration page, click Next.
4. On the database configuration page, click Next.
5. On the parameter configuration page, click Deploy.
Installing the widget application
1. On the Select Application page, select general_PLAT_widget_2.0_<version>.zip, and then click Next.
2. On the page that opens, all applications are selected by default. Click Next.
3. Click Next on the page that opens.
4. Click Next on the page that opens.
5. Click Deploy.
(Optional.) Installing the kernel-region application
1. On the Select Application page, select general_PLAT_kernel-region_2.0<version>.zip, and then click Next.
2. On the page that opens, all applications are selected by default. Click Next.
3. Click Next on the page that opens.
4. Click Next on the page that opens.
5. Click Deploy.
(Optional.) Installing the network application
1. On the Select Application page, select general_PLAT_network_2.0_<version>.zip, and then click Next.
2. On the page that opens, all applications are selected by default. Click Next.
3. Click Next on the page that opens.
4. Click Next on the page that opens.
5. Click Deploy.
(Optional.) Installing the CMDB application
1. On the Select Application page, select general_PLAT_cmdb_2.0_<version>.zip, and then click Next.
2. On the page that opens, all applications are selected by default. Click Next.
3. Click Next on the page that opens.
4. Click Next on the page that opens.
5. Click Deploy.
(Optional.) Installing the suspension application
1. On the Select Application page, select general_PLAT_suspension_2.0_<version>.zip, and then click Next.
2. On the page that opens, all applications are selected by default. Click Next.
3. Click Next on the page that opens.
4. Click Next on the page that opens.
5. Click Deploy.
(Optional.) Installing the SYSLOG application
1. On the Select Application page, select Syslog_<version>.zip, and then click Next.
2. On the page that opens, all applications are selected by default. Click Next.
3. Click Next on the page that opens.
4. Click Next on the page that opens.
5. Click Deploy.
(Optional.) Installing the aggregation application
1. On the Select Application page, select general_PLAT_aggregation_2.0_<version>.zip, and then click Next.
2. On the page that opens, all applications are selected by default. Click Next.
3. Click Next on the page that opens.
4. Click Next on the page that opens.
5. Click Deploy.
(Optional.) Installing the oneclickcheck application
1. On the Select Application page, select general_PLAT_oneclickcheck_2.0_<version>.zip, and then click Next.
2. On the page that opens, all applications are selected by default. Click Next.
3. Click Next on the page that opens.
4. Click Next on the page that opens.
5. Click Deploy.
(Optional.) Installing the network-ext application
1. On the Select Application page, select general_PLAT_network-ext_2.0_<version>.zip, and then click Next.
2. On the page that opens, all applications are selected by default. Click Next.
3. Click Next on the page that opens.
4. Click Next on the page that opens.
5. Click Deploy.
Installing the UCP application
1. On the Select Application page, select UCP-<version>.zip, and then click Next.
2. On the page that opens, all applications are selected by default. Click Next.
3. Click Next on the page that opens.
4. Click Next on the page that opens.
5. Click Deploy.
(Optional.) Installing the COLLECTPLAT application
1. On the Select Application page, select COLLECTPLAT-<version>.zip, and then click Next.
2. On the page that opens, all applications are selected by default. Click Next.
3. Click Next on the page that opens.
4. Click Next on the page that opens.
5. Click Deploy.
(Optional.) Installing the IOM application
1. On the Select Application page, select IOM-<version>.zip, and then click Next.
2. On the page that opens, all applications are selected by default. Click Next.
3. Click Next on the page that opens.
4. Click Next on the page that opens.
5. Click Deploy.
(Optional.) Installing the ADDM application
1. On the Select Application page, select ADDM-<version>.zip, and then click Next.
2. On the page that opens, all applications are selected by default. Click Next.
3. Click Next on the page that opens.
4. Click Next on the page that opens.
5. Click Deploy.
(Optional.) Installing the AGENT application
1. On the Select Application page, select AGENT-<version>.zip, and then click Next.
2. On the page that opens, all applications are selected by default. Click Next.
3. Click Next on the page that opens.
4. Click Next on the page that opens.
5. Click Deploy.
(Optional.) Installing the AGENT_RECEIVER application
1. On the Select Application page, select AGENT_RECEIVER-<version>.zip, and then click Next.
2. On the page that opens, all applications are selected by default. Click Next.
3. Click Next on the page that opens.
4. Click Next on the page that opens.
5. Click Deploy.
(Optional.) Installing the AGENT_UPDATER application
1. On the Select Application page, select AGENT_UPDATER-<version>.zip, and then click Next.
2. On the page that opens, all applications are selected by default. Click Next.
3. Click Next on the page that opens.
4. Click Next on the page that opens.
5. Click Deploy.
(Optional.) Installing the BSM application
1. On the Select Application page, select BSM-<version>.zip, and then click Next.
2. On the page that opens, all applications are selected by default. Click Next.
3. Click Next on the page that opens.
4. Click Next on the page that opens.
5. Click Deploy.
(Optional.) Installing the UEM application
1. On the Select Application page, select UEM-<version>.zip, and then click Next.
2. On the page that opens, all applications are selected by default. Click Next.
3. Click Next on the page that opens.
4. Click Next on the page that opens.
5. Click Deploy.
(Optional.) Installing the ITSM application
1. On the Select Application page, select ITSM-<version>.zip, and then click Next.
2. On the page that opens, all applications are selected by default. Click Next.
3. Click Next on the page that opens.
4. Click Next on the page that opens.
5. Click Deploy.
(Optional.) Installing the NTA application
1. On the Select Application page, select NTA-<version>.zip, and then click Next.
2. On the page that opens, all applications are selected by default. Click Next.
3. Click Next on the page that opens.
4. Click Next on the page that opens.
5. Click Deploy.
(Optional.) Installing the STM application
1. On the Select Application page, select STM-<version>.zip and NQA-<version>.zip, and then click Next.
2. On the page that opens, all applications are selected by default. Click Next.
3. Click Next on the page that opens.
4. Click Next on the page that opens.
5. Click Deploy.
(Optional.) Installing the AOM-SPLUS application
1. On the Select Application page, select U-Center-AOM-SPLUS-<version>.zip, and then click Next.
2. On the page that opens, all applications are selected by default. Select and install the applications separately in multiple steps as a best practice if the environment performance is low or disk read/write speed is slow. Click Next.
3. Click Next on the page that opens.
4. Click Next on the page that opens.
5. Click Deploy.
(Optional.) Installing the AOM-PROBE application
1. On the Select Application page, select U-Center-AOM-PROBE-<version>.zip, and then click Next.
2. By default, 10 probes are selected. You can unselect some probes as needed to adjust the number of probes to be installed. Click Next.
3. Click Next on the page that opens.
4. Click Next on the page that opens.
5. Click Deploy.
Logging in to U-Center 2.0
1. Enter the URL of U-Center 2.0 http://ip_address:30000 in your browser. Replace ip_address with the northbound service VIP, and specify the port number as configured in "Installing the portal application." Figure 4 shows the login page.
Figure 4 U-Center 2.0 login page

2. Enter the username and password, and then click Login.
The default username is admin and the default password is Pwd@12345. If you have set the password when installing the operating system, enter the set password.
Registering the software
After you deploy U-Center 2.0, you must obtain licenses to use it. If you have purchased the product, obtain the relevant license key to complete the consequent registration process. To obtain a trial license, contact relevant H3C marketing personnel.
For more information about requesting and installing licenses, see H3C Software Products Remote Licensing Guide.
License support
|
|
NOTE: The license server and U-Center 2.0 are one-to-one related. A license server can be used by only one U-Center 2.0. |
Table 6 describes the licenses for each component of U-Center 2.0.
|
Component |
License description |
Product code |
Product description |
|
PLAT |
Network basic license |
LIS-IMC9-NSM |
H3C iMC9.0, Intelligent Management Center License |
|
Network quantity license |
LIS-IMC9-NSMA-25 |
H3C iMC9.0, Intelligent Management Platform (Network Management), 25 Licenses |
|
|
LIS-IMC9-NSMB-50 |
H3C iMC9.0, Intelligent Management Platform (Network Management), 50 Licenses |
||
|
LIS-IMC9-NSMC-100 |
H3C iMC9.0, Intelligent Management Platform (Network Management), 100 Licenses |
||
|
LIS-IMC9-NSMD-200 |
H3C iMC9.0, Intelligent Management Platform (Network Management), 200 Licenses |
||
|
LIS-IMC9-NSME-500 |
H3C iMC9.0, Intelligent Management Platform (Network Management), 500 Licenses |
||
|
LIS-IMC9-NSMF-1K |
H3C iMC9.0, Intelligent Management Platform (Network Management), 1000 Licenses |
||
|
Report license |
LIS-UCENTER2-IOM-IAR |
H3C U-Center2.0, IOM, Intelligent Analysis Report License |
|
|
IOM |
U-Center basic license |
LIS-UCENTER2-IOP |
H3C U-Center2.0, Intelligent Operations Platform Software |
|
IOM basic license |
LIS-UCENTER2-IOM |
H3C U-Center2.0, IOM License |
|
|
IOM quantity license |
LIS-UCENTER2-IOM-25 |
H3C U-Center2.0, IOM, 25 Licenses |
|
|
LIS-UCENTER2-IOM-50 |
H3C U-Center2.0, IOM, 50 Licenses |
||
|
LIS-UCENTER2-IOM-100 |
H3C U-Center2.0, IOM, 100 Licenses |
||
|
LIS-UCENTER2-IOM-200 |
H3C U-Center2.0, IOM, 200 Licenses |
||
|
LIS-UCENTER2-IOM-500 |
H3C U-Center2.0, IOM, 500 Licenses |
||
|
LIS-UCENTER2-IOM-1K |
H3C U-Center2.0, IOM, 1000 Licenses |
||
|
CMDB |
CMDB basic license |
LIS-UCENTER2-CMDB |
H3C U-Center2.0, CMDB License |
|
BSM |
BSM basic license |
LIS-UCENTER2-BSM |
H3C U-Center2.0, BSM License |
|
BSM quantity license |
LIS-UCENTER2-BSM-5 |
H3C U-Center2.0, BSM, 5 Licenses |
|
|
LIS-UCENTER2-BSM-10 |
H3C U-Center2.0, BSM, 10 Licenses |
||
|
UEM quantity license |
LIS-UCENTER2-BSM-UEM-1 |
H3C U-Center2.0, BSM, UEM, 1 License |
|
|
LIS-UCENTER2-BSM-UEM-2 |
H3C U-Center2.0, BSM, UEM, 2 License |
||
|
LIS-UCENTER2-BSM-UEM-5 |
H3C U-Center2.0, BSM, UEM, 5 License |
||
|
NTA |
NTA basic license |
LIS-UCENTER2-IOM-NTA |
H3C U-Center2.0, IOM, Network Traffic Analyzer License |
|
NTA quantity license |
LIS-UCENTER2-IOM-NTA-1 |
H3C U-Center2.0, IOM, Network Traffic Analyzer, 1 License |
|
|
LIS-UCENTER2-IOM-NTA-2 |
H3C U-Center2.0, IOM, Network Traffic Analyzer, 2 License |
||
|
LIS-UCENTER2-IOM-NTA-5 |
H3C U-Center2.0, IOM, Network Traffic Analyzer, 5 License |
||
|
ITSM |
ITSM basic license |
LIS-UCENTER2-ITSM |
H3C U-Center2.0, ITSM License |
|
ITSM quantity license |
LIS-UCENTER2-ITSM-5 |
H3C U-Center2.0, ITSM, 5 Licenses |
|
|
LIS-UCENTER2-ITSM-10 |
H3C U-Center2.0, ITSM, 10 Licenses |
||
|
LIS-UCENTER2-ITSM-20 |
H3C U-Center2.0, ITSM, 20 Licenses |
||
|
LIS-UCENTER2-ITSM-50 |
H3C U-Center2.0, ITSM, 50 Licenses |
||
|
LIS-UCENTER2-ITSM-100 |
H3C U-Center2.0, ITSM, 100 Licenses |
||
|
ITSM change release management license |
LIS-UCENTER2-ITSM-CRM |
H3C U-Center2.0, ITSM, Change and Release Management License |
|
|
ITSM service level management basic license |
LIS-UCENTER2-ITSM-SLM |
H3C U-Center2.0, ITSM, Service Level Management License |
|
|
ITSM knowledge base license |
LIS-UCENTER2-ITSM-KB |
H3C U-Center2.0, ITSM, Knowledge Base License |
|
|
ITSM self-service platform license |
LIS-UCENTER2-ITSM-SSD |
H3C U-Center2.0, ITSM, Self-Service Desk License |
|
|
AOM |
IP address management license |
LIS-UCENTER-AOM-IPMS-50 |
H3C UCenter, AOM, IP Address Management System, 50 Licenses |
|
LIS-UCENTER-AOM-IPA-100 |
H3C UCenter, AOM, IP Address Management System, 100 Licenses |
||
|
LIS-UCENTER-AOM-IPA-200 |
H3C UCenter, AOM, IP Address Management System, 200 Licenses |
||
|
LIS-UCENTER-AOM-IPA-500 |
H3C UCenter, AOM, IP Address Management System, 500 Licenses |
||
|
LIS-UCENTER-AOM-IPA-1000 |
H3C UCenter, AOM, IP Address Management System, 1000 Licenses |
||
|
Configuration and compliance intelligent management license |
LIS-UCENTER-AOM-CCI-50-2 |
H3C UCenter, AOM, Configuration And Compliance Intelligent Management, 50 Licenses |
|
|
LIS-UCENTER-AOM-CCI-100-2 |
H3C UCenter, AOM, Configuration And Compliance Intelligent Management, 100 Licenses |
||
|
LIS-UCENTER-AOM-CCI-200-2 |
H3C UCenter, AOM, Configuration And Compliance Intelligent Management, 200 Licenses |
||
|
LIS-UCENTER-AOM-CCI-500-2 |
H3C UCenter, AOM, Configuration And Compliance Intelligent Management, 500 Licenses |
||
|
LIS-UCENTER-AOM-CCI-1000-2 |
H3C UCenter, AOM, Configuration And Compliance Intelligent Management, 1000 Licenses |
||
|
Intelligent inspection license |
LIS-UCENTER-AOM-IIE-50 |
H3C U-Center, AOM, Intelligent Inspection Expert Provider Edition, 50 Licenses |
|
|
LIS-UCENTER-AOM-IIE-100 |
H3C U-Center, AOM, Intelligent Inspection Expert Provider Edition, 100 Licenses |
||
|
LIS-UCENTER-AOM-IIE-200 |
H3C U-Center, AOM, Intelligent Inspection Expert Provider Edition, 200 Licenses |
||
|
LIS-UCENTER-AOM-IIE-500 |
H3C U-Center, AOM, Intelligent Inspection Expert Provider Edition, 500 Licenses |
||
|
LIS-UCENTER-AOM-IIE-1000 |
H3C U-Center, AOM, Intelligent Inspection Expert Provider Edition, 1000 Licenses |
||
|
STM |
STM quantity license |
LIS-UCENTER2-IOM-STM-1 |
H3C U-Center2.0, IOM, STM, 1 License |
|
STM license |
LIS-UCENTER2-IOM-STM |
H3C U-Center2.0, IOM, STM License |
Installing and obtaining licenses
For more information about license request and installation, see H3C Software Products Remote Licensing Guide. After importing a license file to the H3C license management system, configure U-Center 2.0 as the license client to access the license server.
Creating a license client
1. Log in to the license server, and navigate to the Configuration > License Clients page.
2. Click Add. On the page that opens, configure the client name and password.
3. Click OK.
Configuring the client connection
This function allows you to connect the client to the license server to obtain licenses.
1. Log in to U-Center 2.0.
2. Navigate to the System > License Management > License Information page.
3. In the License Server Info area, configure the following parameters of the license server, and then click Connect:
¡ Address—Specify the IP address of the license server.
¡ Port Number—Enter the service port number of the license server. The default value is 5555.
¡ Username—Enter the client name configured on the license server.
¡ Password—Enter the client password configured on the license server.
4. You can obtain the license if the client is connected to the license server. When the connection status is Connected, click Refresh in 5 minutes to view the latest license information.
|
|
IMPORTANT: · To avoid failure to connect to the license server, make sure the firewall is disabled for the license server when you start the client service. · To obtain licenses successfully, make sure the license server has available licenses when you start the client service. |
Viewing the license usage
1. Log in to the license server.
2. Navigate to the Clients > Client Connections page.
On the page that opens, you can view and manage clients connected to the license server.
¡ To bulk disconnect clients from the license server, select them and then click Bulk Disconnect. To disconnect all clients, click Disconnect All.
¡ To reclaim all licenses from a client, click Details in the Actions column for the client and then click Reclaim All on the page that opens. To reclaim a license from the client, click Reclaim for the license.
Backup & recovery
This feature allows you to back up and restore configuration data for U-Center 2.0 components.
|
|
IMPORTANT: · Do not perform any configuration during backup or recovery. · When restoring configuration data, use the backup files with the same timestamp, and make sure the target environment and the backup environment have the same number of nodes. As a best practice, use the backup files with the same timestamp for scheduled recovery. |
Backing up U-Center 2.0 components
Both manual backup and scheduled backup are supported. You can store the backup files on the U-Center 2.0 server or remoter server. Alternatively, you can download the backup file to the local device. The backup file name must be prefix_component name_version_creation time_backup mode (M/A).zip. The prefix is optional. The backup mode is M (manual) or A (automatic).
To back up U-Center 2.0 components:
1. Log in to U-Center 2.0.
2. On the top navigation bar, click SYSTEM.
3. From the navigation pane, select Backup & Recovery.
4. On the page that opens, click Backup to configure the parameters for local backup, remote backup, or scheduled backup.
5. Click OK.
With scheduled backup enabled, U-Center 2.0 will back up the configuration of all the deployed components and store the backup files in the specified path as scheduled.
6. Click Start Backup, and then select the components to be backed up manually.
Restoring U-Center 2.0 components
|
|
CAUTION: · Before restoring a component, verify that its application package is in the following directory: /opt/matrix/app/install/packages/. If not, upload the package to the directory manually. · Restore the PLAT component before CMDB, IOM, BSM, ITSM, and AOM. · To avoid exceptions when restoring a component, make sure the installed component is the same as the component in the uploaded backup file or the backup file in the backup history. |
You can restore components from uploaded backup files or backup files in the backup history.
Restoring components from the uploaded backup files
1. Log in to U-Center 2.0.
2. On the top navigation bar, click SYSTEM.
3. From the navigation pane, select Backup & Recovery.
4. Click the ![]() icon.
icon.
5. In the window that opens, select a locally stored backup file, and then click Upload.
6. Click Recover.
Restoring components from the backup files in the backup history
1. Log in to U-Center 2.0.
2. On the top navigation bar, click SYSTEM.
3. From the navigation pane, select Backup & Recovery.
4. Click Recover in the Actions column for a backup record.
5. Click OK.
Cluster failure recovery
The Matrix clusters support only the single-node failure recovery. For more information, see H3C Unified Platform Deployment Guide.
Upgrading U-Center 2.0
|
|
TIP: · Before upgrading U-Center 2.0, upgrade Matrix and Unified Platform to the corresponding version. For more information, see H3C Unified Platform Deployment Guide. · Follow the installation sequence of application packages to upgrade the applications. |
U-Center 2.0 (E07xx) supports rolling update by deploying the latest version of the U-Center 2.0 application package.
The upgrade takes effect only on U-Center 2.0, and does not affect components installed on U-Center 2.0. If the upgrade fails, uninstall U-Center 2.0 and then reinstall it.
1. Use the northbound service VIP to log in to Matrix.
2. On the top navigation bar, click DEPLOY.
3. From the navigation pane, select Applications.
4. On the page that opens, click Deploy Applications.
5. Upload U-Center 2.0 application installation packages to the system.
After the upload succeeds, the list displays the installation packages.
6. Install the application packages as described in "Installing U-Center 2.0 applications."
Shutting down and powering off servers
Backing up the configuration
1. In the address bar of the browser, enter http://ip_address:30000. Then, enter the username and password.
¡ Both HTTP and HTTPS are supported. The default protocol is HTTP and the default port number is 30000. If the protocol and port number have been set, enter the set protocol and port number.
¡ The default username and password are admin and Pwd@12345, respectively. If the username and password have been set, enter the set username and password.
2. Navigate to the System > Backup & Restore page.
3. Manually back up the configuration and save the backup files locally.
For more information about the backup procedure and restrictions and guidelines, see the online help and configuration backup and restoration in H3C Unified Platform Deployment Guide.
Shutting down and powering off part of nodes
Perform this task to shut down and power off one or multiple nodes to ensure that the system is still operating correctly when U-Center is deployed in cluster mode. This task applies to scenarios such as software upgrade and hardware replacement for nodes and routine inspection.
To shut down and power off part of nodes:
1. In the address bar of the browser, enter https://ip_address:8443/matrix/ui to log in to Matrix. Then, enter the username, password, and verification code.
The default username and password are admin and Pwd@12345, respectively. If the Matrix username and password has been set, enter the set username and password.
2. Navigate to the DEPLOY > Clusters > Deploy Cluster page, select a node. To shut down and power off multiple nodes, disable these nodes one by one. That is, perform operations on a node only after the operations such as backup and restoration have been completed on another node.
3. To disable a node, click the set icon in the upper right corner of the node and click Disable.
4. After a node is disabled, execute the shutdown -h now command to shut down the node.
5. Before you power off a node, make sure the node power status is off on HDM or the power LED of the node indicates that the node is in standby state.
Shutting down and powering off all nodes
Perform this task to shut down and power off the system. This task applies to scenarios such as emergency power outages and equipment room relocations.
To shut down and power off all nodes:
1. In the address bar of the browser, enter https://ip_address:8443/matrix/ui to log in to Matrix. Then, enter the username, password, and verification code.
The default username and password are admin and Pwd@12345, respectively. If the Matrix username and password has been set, enter the set username and password.
2. Navigate to the DEPLOY > Clusters > Deploy Cluster page. Disable all master nodes in the cluster.
3. To disable a node, click the set icon in the upper right corner of the node and click Disable.
4. After a node is disabled, execute the shutdown -h now command to shut down the node.
5. Before you power off a node, make sure the node power status is off on HDM or the power LED of the node indicates that the node is in standby state.
Starting servers
Starting servers and checking the network
1. Power on and start up servers.
2. After the servers start up, execute the ip addr command to verify that the nodes and the service networks are up.
3. Verify network connectivity. Make sure a node can reach the other nodes in different network segments and the client can reach the service networks of all nodes in the cluster.
Starting the system service
1. Access Matrix from the browser.
2. Navigate to the DEPLOY > Clusters > Deploy Cluster page, and then enable nodes.
Wait for about 30 minutes. The actual waiting time might vary by data volume being processed.
3. On the top navigation pane, click DASHBOARD to view system operation statistics to identify whether the system service has started up.
4. On the top navigation pane, click OBSERVE to view workload information about Pods.
Verifying licenses and service functionalities
1. Access U-Center from the browser.
2. Navigate to the System > License Management > License Information page.
3. Verify that the license information is synchronized from the license server and the authorization status is normal.
4. Verify that the features of U-Center are operating correctly.
Uninstalling U-Center 2.0
|
|
IMPORTANT: · To upgrade an application that does not support In-Service Software Upgrade (ISSU), first uninstall the applications deployed after the target application. You need to uninstall the applications in a reverse order of the application installation, and then uninstall the target application. After the upgrade, you must deploy those applications in sequence. · The uninstallation of a single component or application will affect the use of other components or applications. Uninstall a component or application with caution. · After you uninstall and reinstall U-Center 2.0, you must clear the content in the /var/lib/ssdata/ directory on each node. |
To retain the component configuration and data, use the backup function before uninstallation. For more information about the backup function, see "Backup & recovery."
You must uninstall the applications in the revered order they are installed.
To uninstall a single application:
1. Enter https://ip_address:8443/matrix/ui in the browser to log in to Matrix. Replace ip_address with the northbound service VIP.
2. On the top navigation bar, click DEPLOY.
3. From the navigation pane, select Applications.
4. Click the ![]() icon in the Actions column for an application.
icon in the Actions column for an application.
5. In the dialog box that opens, click OK.
FAQ
How can I prepare a disk partition for GlusterFS on a node?
Prepare a disk partition for GlusterFS on each node in the cluster, and record the disk partition name for future use.
To prepare a disk partition for GlusterFS on a node, perform one of the following tasks:
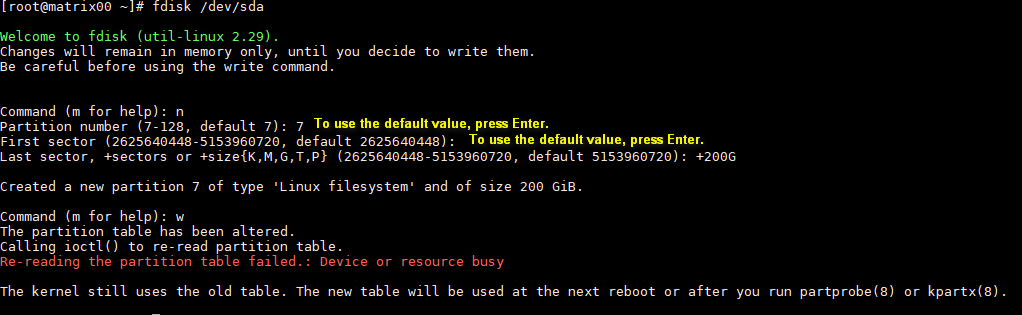
· Manually create a new disk partition.
a. Reserve sufficient disk space for GlusterFS when you install the operating system.
b. After the operating system is installed, execute the fdisk command to create a disk partition.
Figure 5 gives an example of how to create a 250 GB disk partition /dev/sda7 on disk sda. If the system fails to obtain the partition list, execute the reboot command to restart the node.
Figure 5 Creating a disk partition
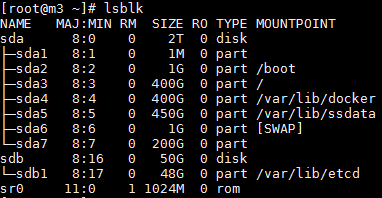
· Use an existing disk partition.
If an existing disk partition with 250 GB or more capacity has not been used or mounted, you can clear the disk partition and use it for GlusterFS, for example, /dev/sda7 as shown in Figure 6. To clear the disk partition, execute the wipefs -a /dev/sda7 command.
Figure 6 Disk partition information
· Prepare an independent disk for GlusterFS.
Execute the wipefs -a command to clear the disk before using it for GlusterFS.
Figure 7 Clearing disk
![]()
I have activated IOM basic and quantity licenses, but the application incorporation fails. An error massage is displayed that the number of monitors exceeds license limit. Why does this happen?
IOM depends on COLLECTPLAT. You must activate CMDB quantity license of COLLECTPLAT.
The AOM application menu is normal when the AOM application is installed but is deleted after the server is rebooted. How can I resolve this issue?
This is a known issue. To resolve this issue, rebuild the pods for installed service modules of AOM, including splusplat, splusini, splusipms, splusccms, and splusomts. You must first rebuild the pod for splusplat, and you can build pods for the other service modules in any sequence. For example, to rebuild the pod for splusplat, execute the following command: kubectl delete pod $(kubectl get pods -n service-software | grep splusplat) -n service-software.
Is there any additional information that I should pay attention to?
After the IOP license (H3C U-Center2.0, Intelligent Operations Platform Software) is registered, two license names, UCENTER-UCENTER-UCD and UCENTER-UCENTER2, are generated.
How can I manually modifying the ES values in the back end?
1. Execute the kubectl edit sts elasticsearch-node-1 -n service-software command.
3. Locate memory in the limits entry, and change its value from 2G to 12G. You can adjust the value 12G as needed. Make sure the value is at least 3G greater than the value following Xms or Xmx.
4. Save the configuration and exit.
5. Execute the kubectl edit sts elasticsearch-node-2 -n service-software command. Repeat steps 2 through 4.
6. Execute the kubectl edit sts elasticsearch-node-3 -n service-software command. Repeat steps 2 through 4.
7. After modification, enter any elasticsearch pod, and execute the curl ‘elasticsearch-http-service:9200/_cat/health?v’ command to view the cluster state. When the status is green or yellow in the returned value, the cluster is available. If a large amount of data exist, ES takes a certain period of time to restore data after you complete the preceding steps.
How can I identify the enabling status for the RAID controller cache policies when configuring a RAID array for servers if the IOPS of a disk is as low as 1k?
When configuring a RAID array for servers, you must enable the RAID controller cache policies. Table 7 shows only some parameters in the RAID configuration. In the actual configuration, see the storage controller user guide for the corresponding server model.
|
Parameter |
Description |
|
Array Label |
Name of the RAID array. The default is DefaultValue0. |
|
Stripe Size |
Strip size, which determines the data block size of a stripe on each drive. |
|
Array Size Selection |
RAID array capacity. |
|
Read Cache |
Read cache policy status. Options include Enabled and Disabled. |
|
Write Cache |
Write cache policy status. Options include: · Enable Always—Always enables the write cache. Without a supercapacitor installed, this status might cause data loss if power supply fails. · Enable With Backup Unit—Disables the write cache when the supercapacitor is absent or not ready. · Disabled—Disables the write cache. |
|
Create RAID via |
Operation after the RAID array is created. Options include Quick Init, Skip Init, Build/Verify, and Clear. |
