| Title | Size | Downloads |
|---|---|---|
| H3C S3600 Series Ethernet Switches Operation Manual-Release 1702(V1.01)-Information Center Operation.pdf | 190.01 KB |
- Table of Contents
- Related Documents
-
| Title | Size | Download |
|---|---|---|
| 38-Information Center Operation | 190.01 KB |
Table of Contents
Introduction to Information Center
Information Center Configuration
Information Center Configuration Task List
Configuring Synchronous Information Output
Configuring to Display the Time Stamp with the UTC Time Zone
Setting to Output System Information to the Console
Setting to Output System Information to a Monitor Terminal
Setting to Output System Information to a Log Host
Setting to Output System Information to the Trap Buffer
Setting to Output System Information to the Log Buffer
Setting to Output System Information to the SNMP NMS
Displaying and Maintaining Information Center
Information Center Configuration Examples
Log Output to a Linux Log Host
When configuring information center, go to these sections for information you are interested in:
l Information Center Configuration
l Displaying and Maintaining Information Center
l Information Center Configuration Examples
![]()
The information center now supports to add the UTC time zone in the time stamp of the output information. See Timestamp for details.
Information Center Overview
Introduction to Information Center
Acting as the system information hub, information center classifies and manages system information. Together with the debugging function (the debugging command), information center offers a powerful support for network administrators and developers in monitoring network performance and diagnosing network problems.
The information center of the system has the following features:
Classification of system information
The system is available with three types of information:
l Log information
l Trap information
l Debugging information
Eight levels of system information
The information is classified into eight levels by severity and can be filtered by level. More emergent information has a smaller severity level.
Table 1-1 Severity description
|
Severity |
Severity value |
Description |
|
emergencies |
1 |
The system is unavailable. |
|
alerts |
2 |
Information that demands prompt reaction |
|
critical |
3 |
Critical information |
|
errors |
4 |
Error information |
|
warnings |
5 |
Warnings |
|
notifications |
6 |
Normal information that needs to be noticed |
|
informational |
7 |
Informational information to be recorded |
|
debugging |
8 |
Information generated during debugging |
Information filtering by severity works this way: information with the severity value greater than the configured threshold is not output during the filtering.
l If the threshold is set to 1, only information with the severity being emergencies will be output;
l If the threshold is set to 8, information of all severities will be output.
Ten channels and six output destinations of system information
The system supports six information output destinations, including the Console, Monitor terminal (monitor), logbuffer, loghost, trapbuffer and SNMP.
The system supports ten channels. The channels 0 through 5 have their default channel names and are associated with six output destinations by default. Both the channel names and the associations between the channels and output destinations can be changed through commands.
Table 1-2 Information channels and output destinations
|
Information channel number |
Default channel name |
Default output destination |
|
0 |
console |
Console (Receives log, trap and debugging information.) |
|
1 |
monitor |
Monitor terminal (Receives log, trap and debugging information, facilitating remote maintenance.) |
|
2 |
loghost |
Log host (Receives log, trap and debugging information and information will be stored in files for future retrieval.) |
|
3 |
trapbuffer |
Trap buffer (Receives trap information, a buffer inside the device for recording information.) |
|
4 |
logbuffer |
Log buffer (Receives log information, a buffer inside the device for recording information.) |
|
5 |
snmpagent |
SNMP NMS (Receives trap information.) |
|
6 |
channel6 |
Not specified (Receives log, trap, and debugging information.) |
|
7 |
channel7 |
Not specified (Receives log, trap, and debugging information.) |
|
8 |
channel8 |
Not specified (Receives log, trap, and debugging information.) |
|
9 |
channel9 |
Not specified (Receives log, trap, and debugging information.) |
![]()
Configurations for the six output destinations function independently and take effect only after the information center is enabled.
Outputting system information by source module
The system information can be classified by source module and then filtered. Some module names and description are shown in Table 1-3.
Table 1-3 Source module name list
|
Module name |
Description |
|
8021X |
802.1X module |
|
ACL |
Access control list module |
|
ADBM |
Address base module |
|
AM |
Access management module |
|
ARP |
Address resolution protocol module |
|
CMD |
Command line module |
|
DEV |
Device management module |
|
DHCP |
Dynamic host configuration protocol module |
|
DNS |
Domain name system module |
|
ETH |
Ethernet module |
|
FIB |
Forwarding module |
|
FTM |
Fabric topology management module |
|
FTMCMD |
Fabric topology management command module |
|
FTPS |
FTP server module |
|
HA |
High availability module |
|
HTTPD |
HTTP server module |
|
IFNET |
Interface management module |
|
IGSP |
IGMP snooping module |
|
IP |
Internet protocol module |
|
LAGG |
Link aggregation module |
|
LINE |
Terminal line module |
|
MSTP |
Multiple spanning tree protocol module |
|
MTRACE |
Multicast traceroute query module |
|
NAT |
Network address translation module |
|
NDP |
Neighbor discovery protocol module |
|
NTDP |
Network topology discovery protocol module |
|
NTP |
Network time protocol module |
|
OSPF |
Open shortest path first module |
|
PKI |
Public key infrastructure module |
|
RDS |
Radius module |
|
RMON |
Remote monitor module |
|
RSA |
Revest, Shamir and Adleman encryption module |
|
SHELL |
User interface module |
|
SNMP |
Simple network management protocol module |
|
SOCKET |
Socket module |
|
SSH |
Secure shell module |
|
SYSMIB |
System MIB module |
|
TAC |
HWTACACS module |
|
TELNET |
Telnet module |
|
TFTPC |
TFTP client module |
|
VLAN |
Virtual local area network module |
|
VRRP |
Virtual router redundancy protocol module |
|
VTY |
Virtual type terminal module |
|
XM |
XModem module |
|
default |
Default settings for all the modules |
To sum up, the major task of the information center is to output the three types of information of the modules onto the ten channels in terms of the eight severity levels and according to the user’s settings, and then redirect the system information from the ten channels to the six output destinations.
System Information Format
The format of system information varies with the output destinations.
l If the output destination is console, monitor terminal, logbuffer, trapbuffer, or SNMP, the system information is in the following format:
timestamp sysname module/level/digest: - unitid –content
![]()
l The space, the forward slash /, and the colon are all required in the above format.
l Before <timestamp> may have %, “#, or * followed with a space, indicating log, alarm, or debugging information respectively.
Below is an example of the format of log information to be output to a monitor terminal:
%Dec 6 10:44:55:283 2006 Sysname NTP/5/NTP_LOG:- 1 - NTP service enable
(“-1-“ indicates that the unit number of the device is 1.)
l If the output destination is loghost, the switch and the log host use the syslog protocol. The system information is in the following format according to RFC 3164 (The BSD Syslog Protocol):
<Int_16>timestamp sysname %%nnmodule/level/digest: source content
![]()
l If the address of the log host is specified in the information center of the switch, when logs are generated, the switch sends the logs to the log host in the above format. For detailed information, refer to Setting to Output System Information to a Log Host.
l There is the syslog process on the Unix or Linux platform, you can start the process to receive the logs sent from the switch; in the Windows platform, you need to install the specific software, and it will operate as the syslog host.
l Some log host software will resolve the received information as well as its format, so that the log format displayed on the log host is different from the one described in this manual.
What follows is a detailed explanation of the information fields involved:
Int_16 (Priority)
The priority is calculated using the following formula: facility*8+severity-1, in which
l facility (the device name) defaults to local7 with the value being 23 (the value of local6 is 22, that of local5 is 21, and so on).
l severity (the information level) ranges from 1 to 8. Table 1-1 details the value and meaning associated with each severity.
Note that the priority field appears only when the information has been sent to the log host.
Timestamp
Timestamp records the time when system information is generated to allow users to check and identify system events.
Note that there is a space between the timestamp and sysname (host name) fields.
The time stamp has the following two formats.
1) Without the universal time coordinated (UTC) time zone, the time stamp is in the format of “Mmm dd hh:mm:ss:ms yyyy”.
2) With the UTC time zone, the time stamp is in the format of “Mmm dd hh:mm:ss:ms yyyy [GMT +|- hh:mm:ss]”.
Each field is described as follows:
l “Mmm” represents the month, and the available values are: Jan, Feb, Mar, Apr, May, Jun, Jul, Aug, Sep, Oct, Nov, and Dec.
l “dd” is the date, which shall follow a space if less than 10, for example, “ 7”.
l “hh:mm:ss:ms” is the local time, where “hh” is in the 24-hour format, ranging from 00 to 23, both “mm” and ”ss” range from 00 to 59, “ms” ranges from 000 to 999. (Note that: the time stamp of the system information sent from the information center to the log host is with a precision of seconds, while that of the system information sent from the system center to the Console, monitor terminal, logbuffer, trapbuffer and the SNMP is with a precision of milliseconds.)
l “yyyy” is the year.
l “[GMT +|- hh:mm:ss]” is the UTC time zone, which represents the time difference with the Greenwich standard time.
Because switches in a network may distribute in different time zones, when the time displayed in the time stamps of output information is the local time on each switch, it is not so convenient for you to locate and solve problems globally. In this case, you can configure the information center to add UTC time zone to the time stamp of the output information, so that you can know the standard time when the information center processing each piece of information. That is, you can know the Greenwich standard time of each switch in the network based on the UTC record in the time stamp.
To add UTC time zone to the time stamp in the information center output information, you must:
l Set the local time zone
l Set the time stamp format in the output destination of the information center to date
l Configure to add UTC time zone to the output information
After the above configuration, the UTC time zone will be displayed in the output information, like the following:
%Dec 8 10:12:21:708 2006 [GMT+08:00:00] Sysname SHELL/5/LOGIN:- 1 - VTY(1.1.0.2) in unit1 login
Sysname
Sysname is the system name of the local switch and defaults to “H3C”.
You can use the sysname command to modify the system name. Refer to the System Maintenance and Debugging part of this manual for details)
Note that there is a space between the sysname and module fields.
%%
This field is a preamble used to identify a vendor. It is displayed only when the output destination is log host.
nn
This field is a version identifier of syslog. It is displayed only when the output destination is log host.
Module
The module field represents the name of the module that generates system information. You can enter the info-center source ? command in system view to view the module list. Refer to Table 1-3 for module name and description.
Between “module” and “level” is a “/”.
Level (Severity)
System information can be divided into eight levels based on its severity, from 1 to 8. Refer to Table 1-1 for definition and description of these severity levels. Note that there is a forward slash “/” between the level (severity) and digest fields.
Digest
The digest field is a string of up to 32 characters, outlining the system information.
Note that there is a colon between the digest and content fields.
For system information destined to the log host,
l If the character string ends with (l), it indicates the log information
l If the character string ends with (t), it indicates the trap information
l If the character string ends with (d), it indicates the debugging information
Source
This field indicates the source of the information, such as the source IP address of the log sender. This field is optional and is displayed only when the output destination is the log host.
Context
This field provides the content of the system information.
Information Center Configuration
Information Center Configuration Task List
Complete the following tasks to configure information center:
|
Task |
Remarks |
|
Optional |
|
|
Configuring to Display the Time Stamp with the UTC Time Zone |
Optional |
|
Optional |
|
|
Optional |
|
|
Optional |
|
|
Optional |
|
|
Optional |
|
|
Optional |
Configuring Synchronous Information Output
Synchronous information output refers to the feature that if the system information such as log, trap, or debugging information is output when the user is inputting commands, the command line prompt (in command editing mode a prompt, or a [Y/N] string in interaction mode) and the input information are echoed after the output.
This feature is used in the case that your input is interrupted by a large amount of system output. With this feature enabled, the system echoes your previous input and you can continue your operations from where you were stopped.
Follow these steps to configure synchronous information output:
|
To do… |
Use the command… |
Remarks |
|
Enter system view |
system-view |
— |
|
Enable synchronous information output |
info-center synchronous |
Required Disabled by default |
![]()
l If the system information is output before you input any information following the current command line prompt, the system does not echo any command line prompt after the system information output.
l In the interaction mode, you are prompted for some information input. If the input is interrupted by system output, no system prompt (except the Y/N string) will be echoed after the output, but your input will be displayed in a new line.
Configuring to Display the Time Stamp with the UTC Time Zone
To add UTC time zone to the time stamp in the information center output information, you must:
l Set the local time zone
l Set the time stamp format in the output destination of the information center to date
l Configure to add the UTC time zone to the output information
Follow these steps to configure to display time stamp with the UTC time zone:
|
To do… |
Use the command… |
Remarks |
|
|
Set the time zone for the system |
clock timezone zone-name { add | minus } time |
Required By default, UTC time zone is set for the system. |
|
|
Enter system view |
system-view |
— |
|
|
Set the time stamp format in the output destination of the information center to date |
Log host direction |
info-center timestamp loghost date |
Required Use either command |
|
Non log host direction |
info-center timestamp { log | trap | debugging } date |
||
|
Set to display the UTC time zone in the output information of the information center |
info-center timestamp utc |
Required By default, no UTC time zone is displayed in the output information |
|
Setting to Output System Information to the Console
Setting to output system information to the console
Follow these steps to set to output system information to the console:
|
To do… |
Use the command… |
Remarks |
|
Enter system view |
system-view |
— |
|
Enable the information center |
info-center enable |
Optional Enabled by default. |
|
Enable system information output to the console |
info-center console channel { channel-number | channel-name } |
Optional By default, the switch uses information channel 0 to output log/debugging/trap information to the console. |
|
Configure the output rules of system information |
info-center source { modu-name | default } channel { channel-number | channel-name } [ { log | trap | debug } { level severity | state state } ]* |
Optional Refer to Table 1-4 for the default output rules of system information. |
|
Set the format of time stamp in the output information |
info-center timestamp { log | trap | debugging } { boot | date | none } |
Optional By default, the time stamp format of the log and trap output information is date, and that of the debugging output information is boot. |
![]()
To view the debugging information of some modules on the switch, you need to set the type of the output information to debug when configuring the system information output rules, and use the debugging command to enable debugging for the corresponding modules.
Table 1-4 Default output rules for different output destinations
|
Output destination |
Modules allowed |
LOG |
TRAP |
DEBUG |
|||
|
Enabled/disabled |
Severity |
Enabled/disabled |
Severity |
Enabled/disabled |
Severity |
||
|
Console |
default (all modules) |
Enabled |
warnings |
Enabled |
debugging |
Enabled |
debugging |
|
Monitor terminal |
default (all modules) |
Enabled |
warnings |
Enabled |
debugging |
Enabled |
debugging |
|
Log host |
default (all modules) |
Enabled |
informational |
Enabled |
debugging |
Disabled |
debugging |
|
Trap buffer |
default (all modules) |
Disabled |
informational |
Enabled |
warnings |
Disabled |
debugging |
|
Log buffer |
default (all modules) |
Enabled |
warnings |
Disabled |
debugging |
Disabled |
debugging |
|
SNMP NMS |
default (all modules) |
Disabled |
debugging |
Enabled |
warnings |
Disabled |
debugging |
Enabling system information display on the console
After setting to output system information to the console, you need to enable the associated display function to display the output information on the console.
Follow these steps to enable the system information display on the console:
|
To do… |
Use the command… |
Remarks |
|
Enable the debugging/log/trap information terminal display function |
terminal monitor |
Optional Enabled by default. |
|
Enable debugging information terminal display function |
terminal debugging |
Optional Disabled by default. |
|
Enable log information terminal display function |
terminal logging |
Optional Enabled by default. |
|
Enable trap information terminal display function |
terminal trapping |
Optional Enabled by default. |
![]()
Make sure that the debugging/log/trap information terminal display function is enabled (use the terminal monitor command) before you enable the corresponding terminal display function by using the terminal debugging, terminal logging, or terminal trapping command.
Setting to Output System Information to a Monitor Terminal
System information can also be output to a monitor terminal, which is a user terminal that has login connections through the AUX, or VTY user interface.
Setting to output system information to a monitor terminal
Follow these steps to set to output system information to a monitor terminal:
|
To do… |
Use the command… |
Remarks |
|
Enter system view |
system-view |
— |
|
Enable the information center |
info-center enable |
Optional Enabled by default. |
|
Enable system information output to Telnet terminal or dumb terminal |
info-center monitor channel { channel-number | channel-name } |
Optional By default, a switch outputs log/debugging/trap information to a user terminal through information channel 1. |
|
Configure the output rules of system information |
info-center source { modu-name | default } channel { channel-number | channel-name } [ { log | trap | debug } { level severity | state state } ]* |
Optional Refer to Table 1-4 for the default output rules of system information. |
|
Set the format of time stamp in the output information |
info-center timestamp { log | trap | debugging } { boot | date | none } |
Optional By default, the time stamp format of the log and trap output information is date, and that of the debugging output information is boot. |
![]()
l When there are multiple Telnet users or dumb terminal users, they share some configuration parameters including module filter, language and severity level threshold. In this case, change to any such parameter made by one user will also be reflected on all other user terminals.
l To view debugging information of specific modules, you need to set the information type as debug when setting the system information output rules, and enable debugging for corresponding modules through the debugging command.
Enabling system information display on a monitor terminal
After setting to output system information to a monitor terminal, you need to enable the associated display function in order to display the output information on the monitor terminal.
Follow these steps to enable the display of system information on a monitor terminal:
|
To do… |
Use the command… |
Remarks |
|
Enable the debugging/log/trap information terminal display function |
terminal monitor |
Optional Enabled by default |
|
Enable debugging information terminal display function |
terminal debugging |
Optional Disabled by default |
|
Enable log information terminal display function |
terminal logging |
Optional Enabled by default |
|
Enable trap information terminal display function |
terminal trapping |
Optional Enabled by default |
![]()
Make sure that the debugging/log/trap information terminal display function is enabled (use the terminal monitor command) before you enable the corresponding terminal display function by using the terminal debugging, terminal logging, or terminal trapping command.
Setting to Output System Information to a Log Host
Follow these steps to set to output system information to a log host:
|
To do… |
Use the command… |
Remarks |
|
Enter system view |
system-view |
— |
|
Enable the information center |
info-center enable |
Optional Enabled by default. |
|
Enable information output for a specified switch in a fabric |
info-center switch-on { unit unit-id | master | all } [ debugging | logging | trapping ]* |
Optional By default, debugging information output is enabled, and log and trap information output are disabled for the master switch in a fabric. Debugging, log and trap information output are all disabled for other switches in the fabric. |
|
Enable system information output to a log host |
info-center loghost host-ip-addr [ channel { channel-number | channel-name } | facility local-number ]* |
Required By default, the switch does not output information to the log host. After you configure the switch to output information to the log host, the switch uses information channel 2 by default. |
|
Configure the source interface through which log information is sent to the log host |
info-center loghost source interface-type interface-number |
Optional By default, no source interface is configured, and the system automatically selects an interface as the source interface. |
|
Configure the output rules of system information |
info-center source { modu-name | default } channel { channel-number | channel-name } [ { log | trap | debug } { level severity | state state } ]* |
Optional Refer to Table 1-4 for the default output rules of system information. |
|
Set the format of the time stamp to be sent to the log host |
info-center timestamp loghost { date | no-year-date | none } |
Optional By default, the time stamp format of the information output to the log host is date. |
![]()
l After the switches form a fabric, you can use the info-center switch-on command to enable the information output for the switches to make the log, debugging and trap information of each switch in the fabric synchronous. Each switch sends its own information to other switches in the fabric and receives information sent by other switches at the same time to update the information on itself. In this way, the switch ensures the synchronization of log, debugging and trap information in the whole fabric.
l Be sure to set the correct IP address when using the info-center loghost command. A loopback IP address will cause an error message prompting that this address is invalid.
Setting to Output System Information to the Trap Buffer
Follow these steps to set to output system information to the trap buffer:
|
To do… |
Use the command… |
Remarks |
|
Enter system view |
system-view |
— |
|
Enable the information center |
info-center enable |
Optional Enabled by default. |
|
Enable system information output to the trap buffer |
info-center trapbuffer [channel { channel-number | channel-name } | size buffersize]* |
Optional By default, the switch uses information channel 3 to output trap information to the trap buffer, which can holds up to 256 items by default. |
|
Configure the output rules of system information |
info-center source { modu-name | default } channel { channel-number | channel-name } [ { log | trap | debug } { level severity | state state } ]* |
Optional Refer to Table 1-4 for the default output rules of system information. |
|
Set the format of time stamp in the output information |
info-center timestamp { log | trap | debugging } { boot | date | none } |
Optional By default, the time stamp format of the output trap information is date. |
Setting to Output System Information to the Log Buffer
Follow these steps to set to output system information to the log buffer:
|
To do… |
Use the command… |
Remarks |
|
Enter system view |
— |
|
|
Enable the information center |
info-center enable |
Optional Enabled by default. |
|
Enable information output to the log buffer |
info-center logbuffer [ channel { channel-number | channel-name } | size buffersize ]* |
Optional By default, the switch uses information channel 4 to output log information to the log buffer, which can holds up to 512 items by default. |
|
Configure the output rules of system information |
info-center source { modu-name | default } channel { channel-number | channel-name } [ { log | trap | debug } { level severity | state state } ]* |
Optional Refer to Table 1-4 for the default output rules of system information. |
|
Set the format of time stamp in the output information |
info-center timestamp { log | trap | debugging } { boot | date | none } |
Optional By default, the time stamp format of the output log information is date. |
Setting to Output System Information to the SNMP NMS
Follow these steps to set to output system information to the SNMP NMS:
|
To do… |
Use the command… |
Remarks |
|
Enter system view |
system-view |
— |
|
Enable the information center |
info-center enable |
Optional Enabled by default. |
|
Enable information output to the SNMP NMS |
info-center snmp channel { channel-number | channel-name } |
Optional By default, the switch outputs trap information to SNMP through channel 5. |
|
Configure the output rules of system information |
info-center source { modu-name | default } channel { channel-number | channel-name } [ { log | trap | debug } { level severity | state state } ]* |
Optional Refer to Table 1-4 for the default output rules of system information. |
|
Set the format of time stamp in the output information |
info-center timestamp { log | trap | debugging } { boot | date | none } |
Optional By default, the time stamp format of the information output to the SNMP NMS is date. |
![]()
To send information to a remote SNMP NMS properly, related configurations are required on both the switch and the SNMP NMS. For the detailed configuration, refer to the SNMP-RMON part.
Displaying and Maintaining Information Center
|
To do… |
Use the command… |
Remarks |
|
Display information on an information channel |
display channel [ channel-number | channel-name ] |
Available in any view |
|
Display the operation status of information center, the configuration of information channels, the format of time stamp and the information output in case of fabric |
display info-center [ unit unit-id ] |
|
|
Display the status of log buffer and the information recorded in the log buffer |
display logbuffer [ unit unit-id ] [ level severity | size buffersize ]* [ | { begin | exclude | include } regular-expression ] |
|
|
Display the summary information recorded in the log buffer |
display logbuffer summary [ level severity ] |
|
|
Display the status of trap buffer and the information recorded in the trap buffer |
display trapbuffer [ unit unit-id ] [ size buffersize ] |
|
|
Clear information recorded in the log buffer |
reset logbuffer [ unit unit-id ] |
Available in user view |
|
Clear information recorded in the trap buffer |
reset trapbuffer [ unit unit-id ] |
Information Center Configuration Examples
Log Output to a UNIX Log Host
Network requirements
The switch sends the following log information to the Unix log host whose IP address is 202.38.1.10: the log information of the two modules ARP and IP, with severity higher than “informational”.
Network diagram
Figure 1-1 Network diagram for log output to a Unix log host

Configuration procedure
1) Configure the switch:
# Enable the information center.
<Switch> system-view
[Switch] info-center enable
# Disable the function of outputting information to log host channels, because all modules output log information to the log host channels by default.
[Switch] undo info-center source default channel loghost
# Configure the host whose IP address is 202.38.1.10 as the log host. Permit ARP and IP modules to output information with severity level higher than informational to the log host.
[Switch] info-center loghost 202.38.1.10 facility local4
[Switch] info-center source arp channel loghost log level informational debug state off trap state off
[Switch] info-center source ip channel loghost log level informational debug state off trap state off
2) Configure the log host:
The operations here are performed on SunOS 4.0. The operations on other manufacturers' Unix operation systems are similar.
Step 1: Execute the following commands as the super user (root user).
# mkdir /var/log/Switch
# touch /var/log/Switch/information
Step 2: Edit the file “/etc/syslog.conf” as the super user (root user) to add the following selector/action pairs.
# Switch configuration messages
local4.info /var/log/Switch/information
![]()
When you edit the file “/etc/syslog.conf”, note that:
l A note must start in a new line, starting with a “#” sign.
l In each pair, a tab should be used as a separator instead of a space.
l No space is allowed at the end of a file name.
l The device name (facility) and received log information severity level specified in the file “/etc/syslog.conf” must be the same as those corresponding parameters configured in the commands info-center loghost and info-center source. Otherwise, log information may not be output to the log host normally.
Step 3: After the log file “information” is created and the file “/etc/syslog.conf” is modified, execute the following command to send a HUP signal to the system daemon “syslogd”, so that it can reread its configuration file “/etc/syslog.conf”.
# ps -ae | grep syslogd
147
# kill -HUP 147
After all the above operations, the switch can make records in the corresponding log file.
![]()
Through combined configuration of the device name (facility), information severity level threshold (severity), module name (filter) and the file “syslog.conf”, you can sort information precisely for filtering.
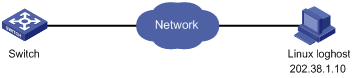
Log Output to a Linux Log Host
Network requirements
The switch sends the following log information to the Linux log host whose IP address is 202.38.1.10: All modules' log information, with severity higher than “errors”.
Network diagram
Figure 1-2 Network diagram for log output to a Linux log host
Configuration procedure
1) Configure the switch:
# Enable the information center.
<Switch> system-view
[Switch] info-center enable
# Configure the host whose IP address is 202.38.1.10 as the log host. Permit all modules to output log information with severity level higher than error to the log host.
[Switch] info-center loghost 202.38.1.10 facility local7
[Switch] info-center source default channel loghost log level errors debug state off trap state off
2) Configure the log host:
Step 1: Execute the following commands as a super user (root user).
# mkdir /var/log/Switch
# touch /var/log/Switch/information
Step 2: Edit the file “/etc/syslog.conf” as the super user (root user) to add the following selector/action pairs.
# Switch configuration messages
local7.info /var/log/Switch/information
![]()
Note the following items when you edit file “/etc/syslog.conf”.
l A note must start in a new line, starting with a “#" sign.
l In each pair, a tab should be used as a separator instead of a space.
l No space is permitted at the end of the file name.
l The device name (facility) and received log information severity specified in file “/etc/syslog.conf” must be the same with those corresponding parameters configured in commands info-center loghost and info-center source. Otherwise, log information may not be output to the log host normally.
Step 3: After the log file “information” is created and the file “/etc/syslog.conf” is modified, execute the following commands to view the process ID of the system daemon “syslogd”, stop the process, and then restart the daemon "syslogd" in the background with the “-r” option.
# ps -ae | grep syslogd
147
# kill -9 147
# syslogd -r &
In case of Linux log host, the daemon “syslogd” must be started with the “-r” option.
After all the above operations, the switch can record information in the corresponding log file.
![]()
Through combined configuration of the device name (facility), information severity level threshold (severity), module name (filter) and the file “syslog.conf”, you can sort information precisely for filtering.
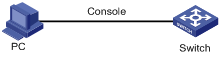
Log Output to the Console
Network requirements
The switch sends the following information to the console: the log information of the two modules ARP and IP, with severity higher than “informational”.
Network diagram
Figure 1-3 Network diagram for log output to the console
Configuration procedure
# Enable the information center.
<Switch> system-view
[Switch] info-center enable
# Disable the function of outputting information to the console channels.
[Switch] undo info-center source default channel console
# Enable log information output to the console. Permit ARP and IP modules to output log information with severity level higher than informational to the console.
[Switch] info-center console channel console
[Switch] info-center source arp channel console log level informational debug state off trap state off
[Switch] info-center source ip channel console log level informational debug state off trap state off
# Enable terminal display.
<Switch> terminal monitor
<Switch> terminal logging
Configuration Example
Network requirements
l The switch is in the time zone of GMT+ 08:00:00.
l The time stamp format of output log information is date.
l UTC time zone will be added to the output information of the information center.
Network diagram
Figure 1-4 Network diagram

Configuration procedure
# Name the local time zone z8 and configure it to be eight hours ahead of UTC time.
<Switch> clock timezone z8 add 08:00:00
# Set the time stamp format of the log information to be output to the log host to date.
<Switch> system-view
System View: return to User View with Ctrl+Z.
[Switch] info-center timestamp loghost date
# Configure to add UTC time to the output information of the information center.
[Switch] info-center timestamp utc
